Case Study
1. Introduction
Mothership is an open-source, platform-as-a-service (PaaS) that enables teams to easily deploy and manage small applications. It uses a multi-tenant, distributed architecture, the core of which is a Node.js application that directs a cluster of nodes on which deployed applications run. Mothership allows developers to focus on application code, rather than infrastructure.
A demo of deploying a Rails application on Mothership, by uploading a zip of the app's source code using the Mothership web client
It abstracts away the inherent complexities of deploying applications to production: users simply provide Mothership with an application’s source code, and it takes care of provisioning servers, packaging the code, and booting the app under a live URL. This provides the benefits that have made proprietary, third-party services like Heroku popular, while allowing teams to retain full control over their deployment platform. It is the ideal solution for teams looking to deploy small, internal-facing applications, without wasting valuable engineering time.
To build Mothership, we had to solve a host of engineering challenges: creating a scalable, multi-tenant application environment, packaging applications into secure isolated environments, scheduling resources, handling service discovery, as well as providing essential features for managing deployed applications.
In this case study, we discuss each of these challenges in turn, as well as how we solved them. But first, we take a step back and explain what an open-source PaaS is and where it lies on the spectrum of deployment options.
2. What is a Platform-as-a-Service
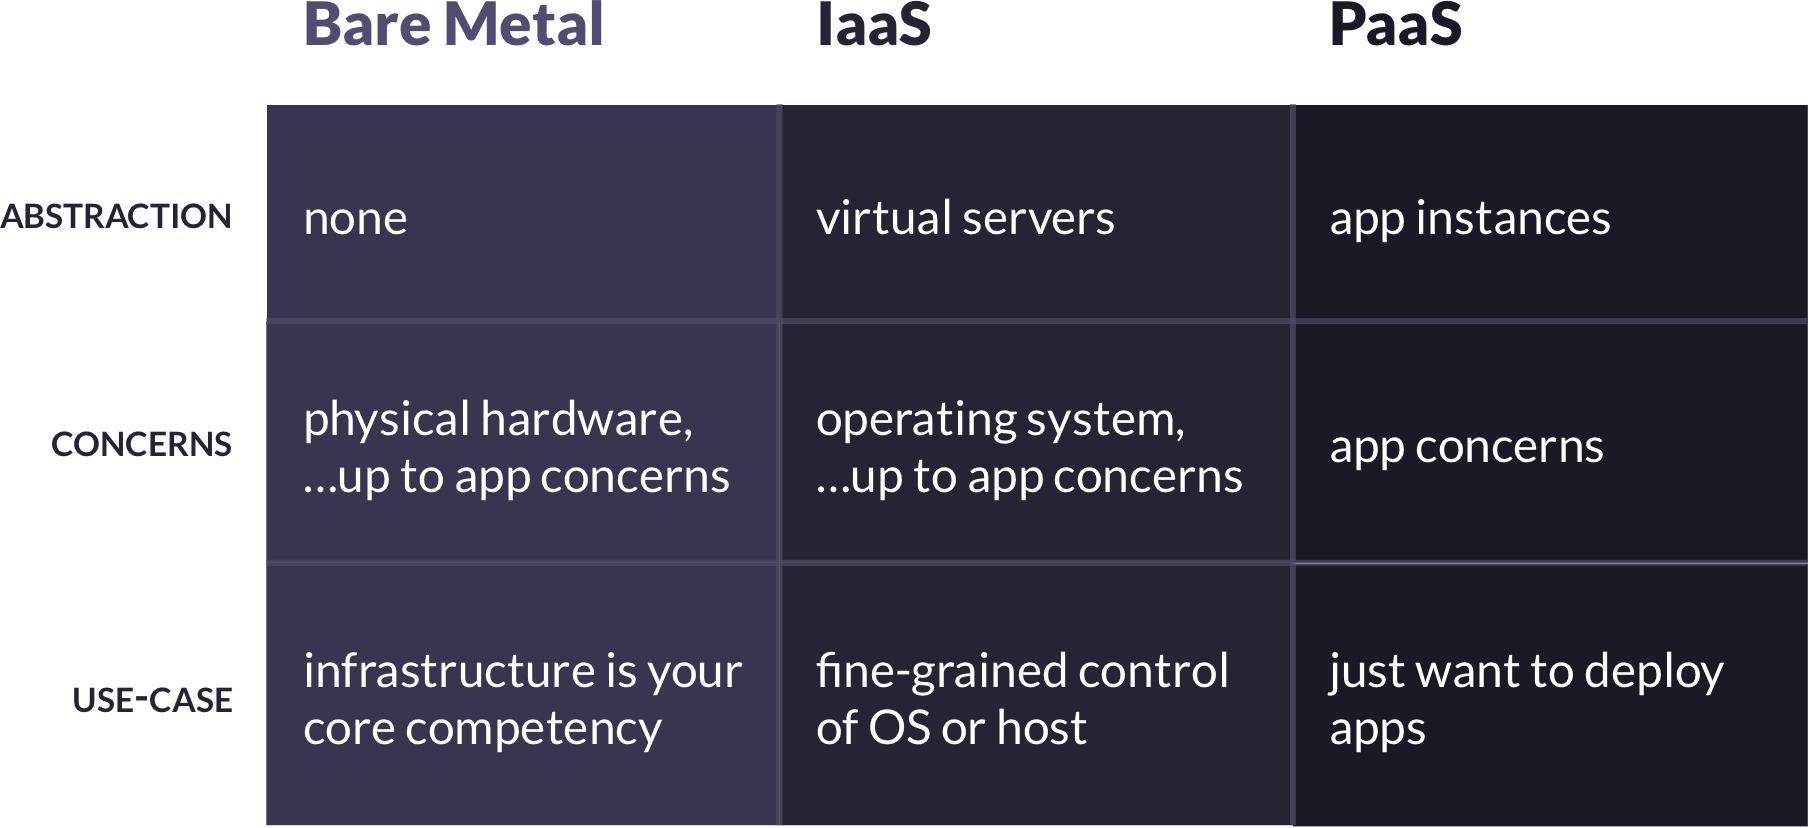
At its core, deploying a web application requires running a physical server with a public IP address, mapping URLs to that address, installing operating system dependencies and runtimes, transferring source code to the server, installing application dependencies, and starting the application listening on an appropriate port. There are three primary options for accomplishing these tasks: “bare metal” deployments, infrastructure as a service deployments, and platform-as-a-service deployments. These options are defined by the level of abstraction at which they require developers to operate, and each is best suited to different use-cases.
2.1 PaaS
More and more, developers are turning to platforms-as-a-service to handle deployments. The reason is clear. With a PaaS, developers no longer need to think about OS-level concerns – they simply provide the PaaS with their application source code, and the PaaS creates an environment in which the code runs. With a PaaS, application developers are free to focus exclusively on application-level concerns – which, of course, is what they do best.
Most PaaS offerings are proprietary. A proprietary PaaS is a third-party service provider built on top of an IaaS provider. For example, developers pay Heroku a monthly fee to host their applications, and behind the scenes Heroku manages and scales a fleet of virtual servers provided by AWS’s EC2 service. The benefits of this model are obvious: a third-party is responsible for all lower-level concerns, allowing developers to work at a high-level of abstraction.
The downside, however, is that application deployment is now dependent on the business models of both the PaaS provider and the IaaS provider, and there are more parties you need to trust with your data and code. While often a worthwhile tradeoff, this does present potential business risks.
2.1.1 Open-Source PaaS
One way of mitigating these risks is with an open-source PaaS. Because it is open-source, control of the platform remains with the developers using it. This confers some interesting benefits:
- Control: Application developers retain control over the platform, and so are not subject to the business decisions of a third-party provider
- Provider Agnostic: Application developers are free to move their PaaS to different IaaS providers as needed
- Trust: Application developers no longer need to entrust a third-party PaaS provider with their data and source code
- Other OSS Benefits: Application developers are free to audit the PaaS source code, patch bugs, or fork and customize to their needs
However, there are also some downsides. The most significant difference between a proprietary and open-source PaaS is the management of the PaaS itself. With a proprietary PaaS, the provider manages the platform, but with an open-source PaaS, the development team using the PaaS is also responsible for managing it. This includes things like initially setting up the PaaS, and horizontally scaling it as the number of deployed applications grows.
Additionally, an open-source PaaS is not likely to offer feature parity with a mature proprietary PaaS. Nor will an open-source PaaS be able to offer the same level of up-time and scalability for large or mission-critical applications (or, at least, not without significant maintenance efforts from developers).
So when do the tradeoffs of an open-source PaaS make sense? To our minds, a primary use-case is for teams needing to quickly deploy small applications for internal use. In this case, eliminating a third-party provider and their business decisions keeps the deployment platform predictable. This is a net win for small applications that don’t need all of the advanced features of a mature proprietary PaaS, and whose uptime and scalability needs are more modest.
3. Mothership
We designed Mothership for easy deployment of small, internal-facing applications. To do so, we began with the following high-level goals:
- Mothership should provide a centralized interface for teams to manage their deployed applications, via either a web or command-line interface
- Mothership should support deploying database-backed applications written in a variety of popular languages and frameworks, without requiring knowledge of server configuration, networking, or containerization
- Mothership should allow easy application management: running console commands against apps, setting environment variables, monitoring app health, viewing service logs, and performing app database backups/restores
- Mothership’s interface should be familiar to users of proprietary PaaS’s like Heroku, Elastic Beanstalk, or Google App Engine
Since an open-source PaaS also requires some administration, we had three goals for the experience of managing Mothership:
- It should be easy to get Mothership up and running for the first time
- It should be easy to horizontally scale Mothership as the number deployed applications grows
- Mothership’s core architecture should be IaaS agnostic
In the remaining sections, we discuss the challenges that arose in architecting a system to meet these goals, and how we solved them.
4. Tenancy
One of the first questions that we confronted was where deployed applications should live.
4.1 Single-tenancy
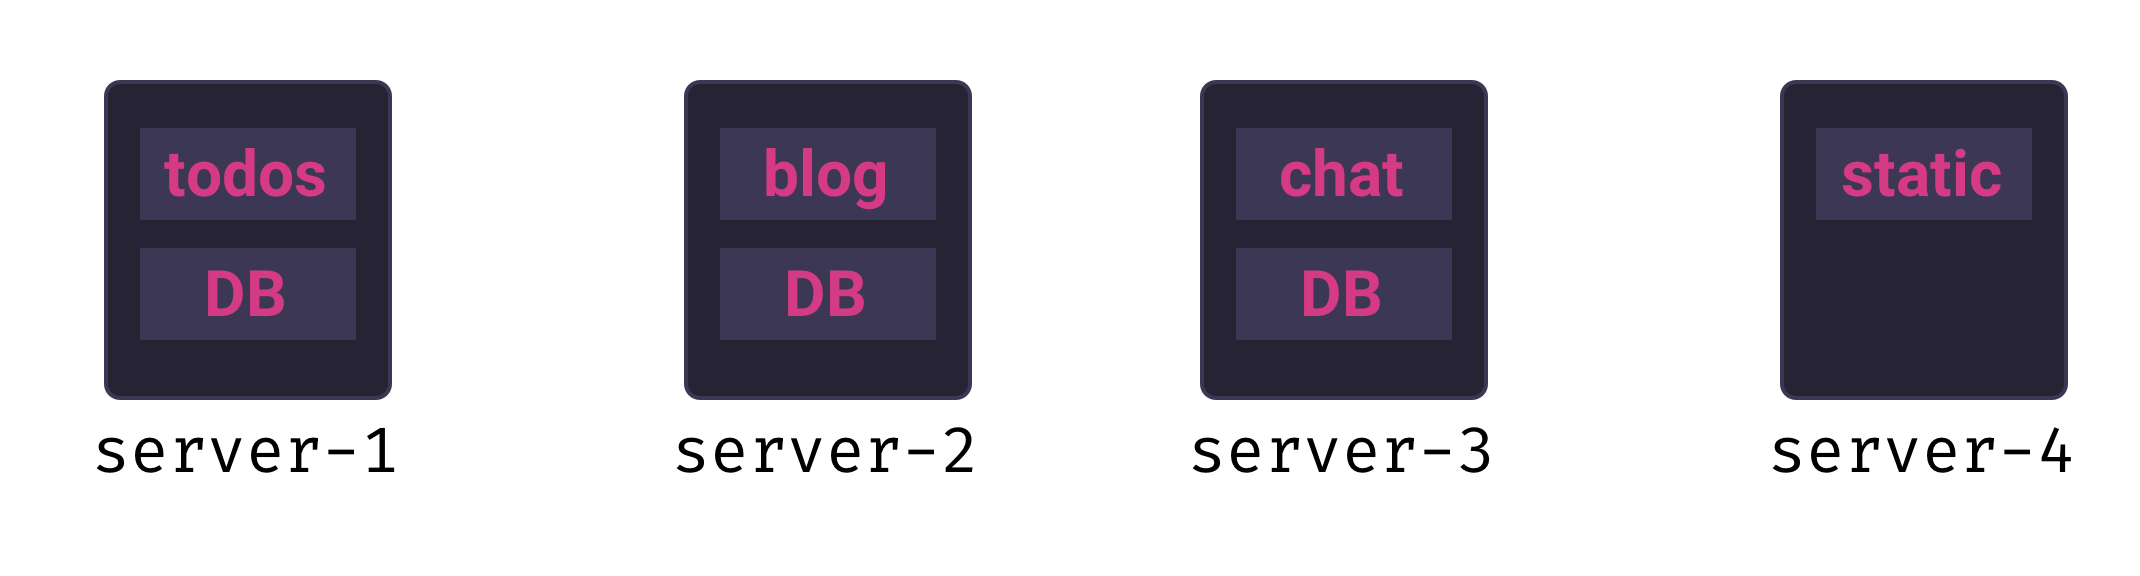
A common way of doing manual deploys is to first provision a new VPS, copy over the source code, and boot up the app server. With this approach, there is one application per node. This is a single tenant model, and it offers several benefits:
- Routing requests to individual apps is easy, since each app lives on its own server with a static IP address
- Each application has access to a predictable amount of RAM, storage, and compute resources
- Easy isolation: each app is on its own node, so there is no concern of app dependency conflicts or security breaches between apps
It is possible to design a PaaS with a single-tenant architecture – in fact, an early version of Mothership took exactly this approach:
Unfortunately, there are two significant downsides to this approach:
- Speed: provisioning a new VPS for each new app significantly slows down application deployment
- Resource utilization: small, internal-facing applications are unlikely to ever need the full resources of even a modest VPS – this means we would not be fully utilizing the resources we’re paying for
While the speed penalty is annoying, the resource utilization issue is a show-stopper for our use-case. A single-tenancy PaaS for small applications would be wasteful and unnecessarily expensive.
4.2 Multi-tenancy
The alternative is a multi-tenant architecture. In a multi-tenant model multiple applications run concurrently on the same server. Applications can be added or removed more quickly than in a single-tenant model, and resources will be better utilized because a single server can run many small applications.
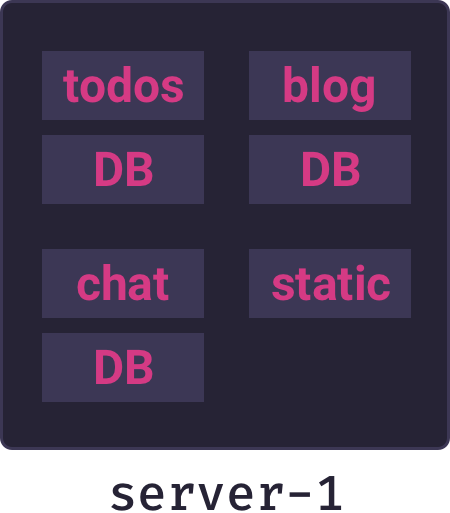
Multi-tenancy is the right model for our use-case, and the above diagram represents the core architecture of Mothership. But designing a multi-tenancy architecture introduces significant challenges that complicate the picture.
5. Application Packaging
Now that we have decided to deploy multiple applications on a single server, we have some problems to address. It is a major security vulnerability for all applications to share a single filesystem (ask anyone who ran a WordPress site on a shared host back in the 2000s) – that would mean if one application is compromised, all others are as well. Additionally, applications’ dependencies can come into conflict – for example, one app may require PHP 5 and another PHP 7. What we need is a way to create an isolated environment for each application, but where we can efficiently run multiple environments on a single node.
5.1 Containers
As it happens, there is a robust solution for exactly this problem: containers. Containers provide isolated environments that appear to be unique OS instances from the inside, but which in fact share the resources of the host OS. This technology is made possible by low-level Linux features such as cgroups, union mount filesystems, and network namespaces. If we run each application inside of a container, it will be able to install its own dependencies and will not be able to interact with other applications, which is exactly what we want.
5.2 Docker
There are various containerization technologies available, but the dominant implementation is from Docker. We decided to use Docker for Mothership’s containerization stack because of its ample documentation, ease-of-use, and vast ecosystem. Equally important is Docker’s client-server architecture. Docker has three main components:
- The Docker Engine, which is a server that typically runs as a daemon on a so-called “Docker host”
- The Docker REST API, which clients can use to issue Docker commands to a Docker host
- The Docker CLI, which uses the REST API to interact with whatever Docker host it is connected to
From the perspective of most users, Docker just is the CLI. When you install Docker locally, a local Docker daemon is started and the CLI transparently connects to it via a Unix domain socket. It’s easy to miss the fact you are using a client that issues API requests to a server. But that’s what is happening under the hood, and it means that a Docker client can just as easily connect to a remote Docker host.
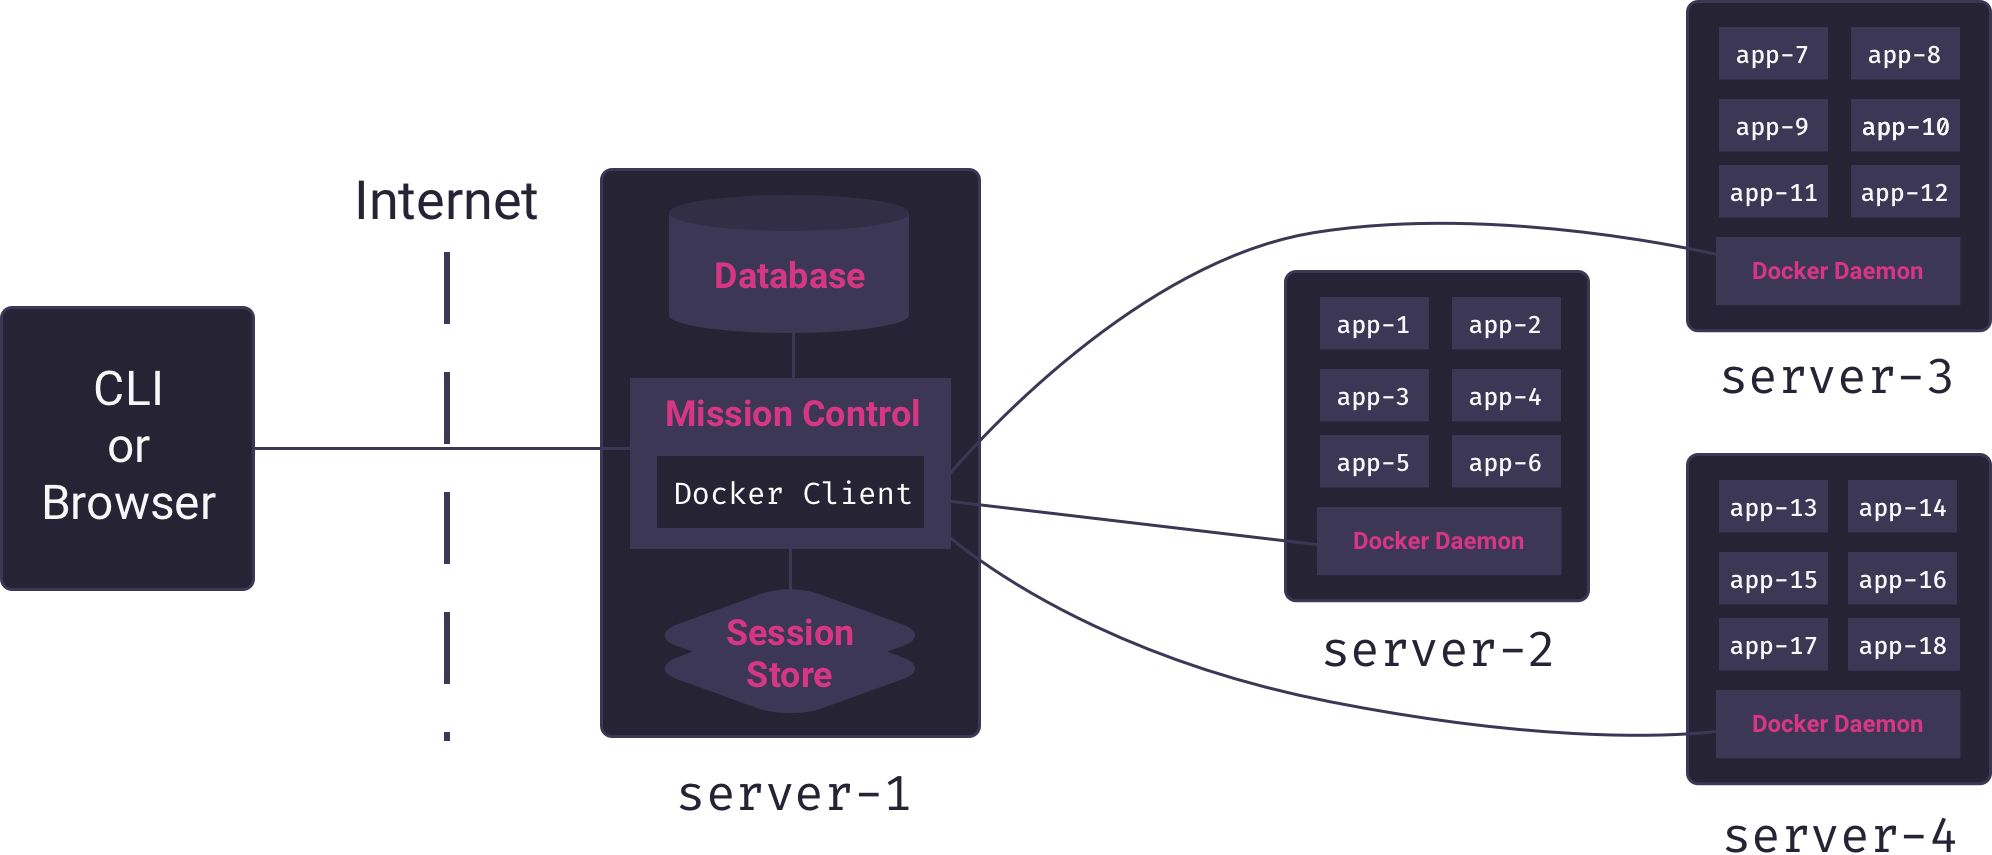
Because the Mothership application – which is in charge of deploying and managing applications – runs on a different server from the one in which application containers run, it needs the ability to issue commands to a remote Docker host. Docker’s client-server architecture makes this use-case possible. Mothership’s Mission Control server can connect remotely to the Docker host on a separate server to build and run containers, as illustrated in the following diagram.
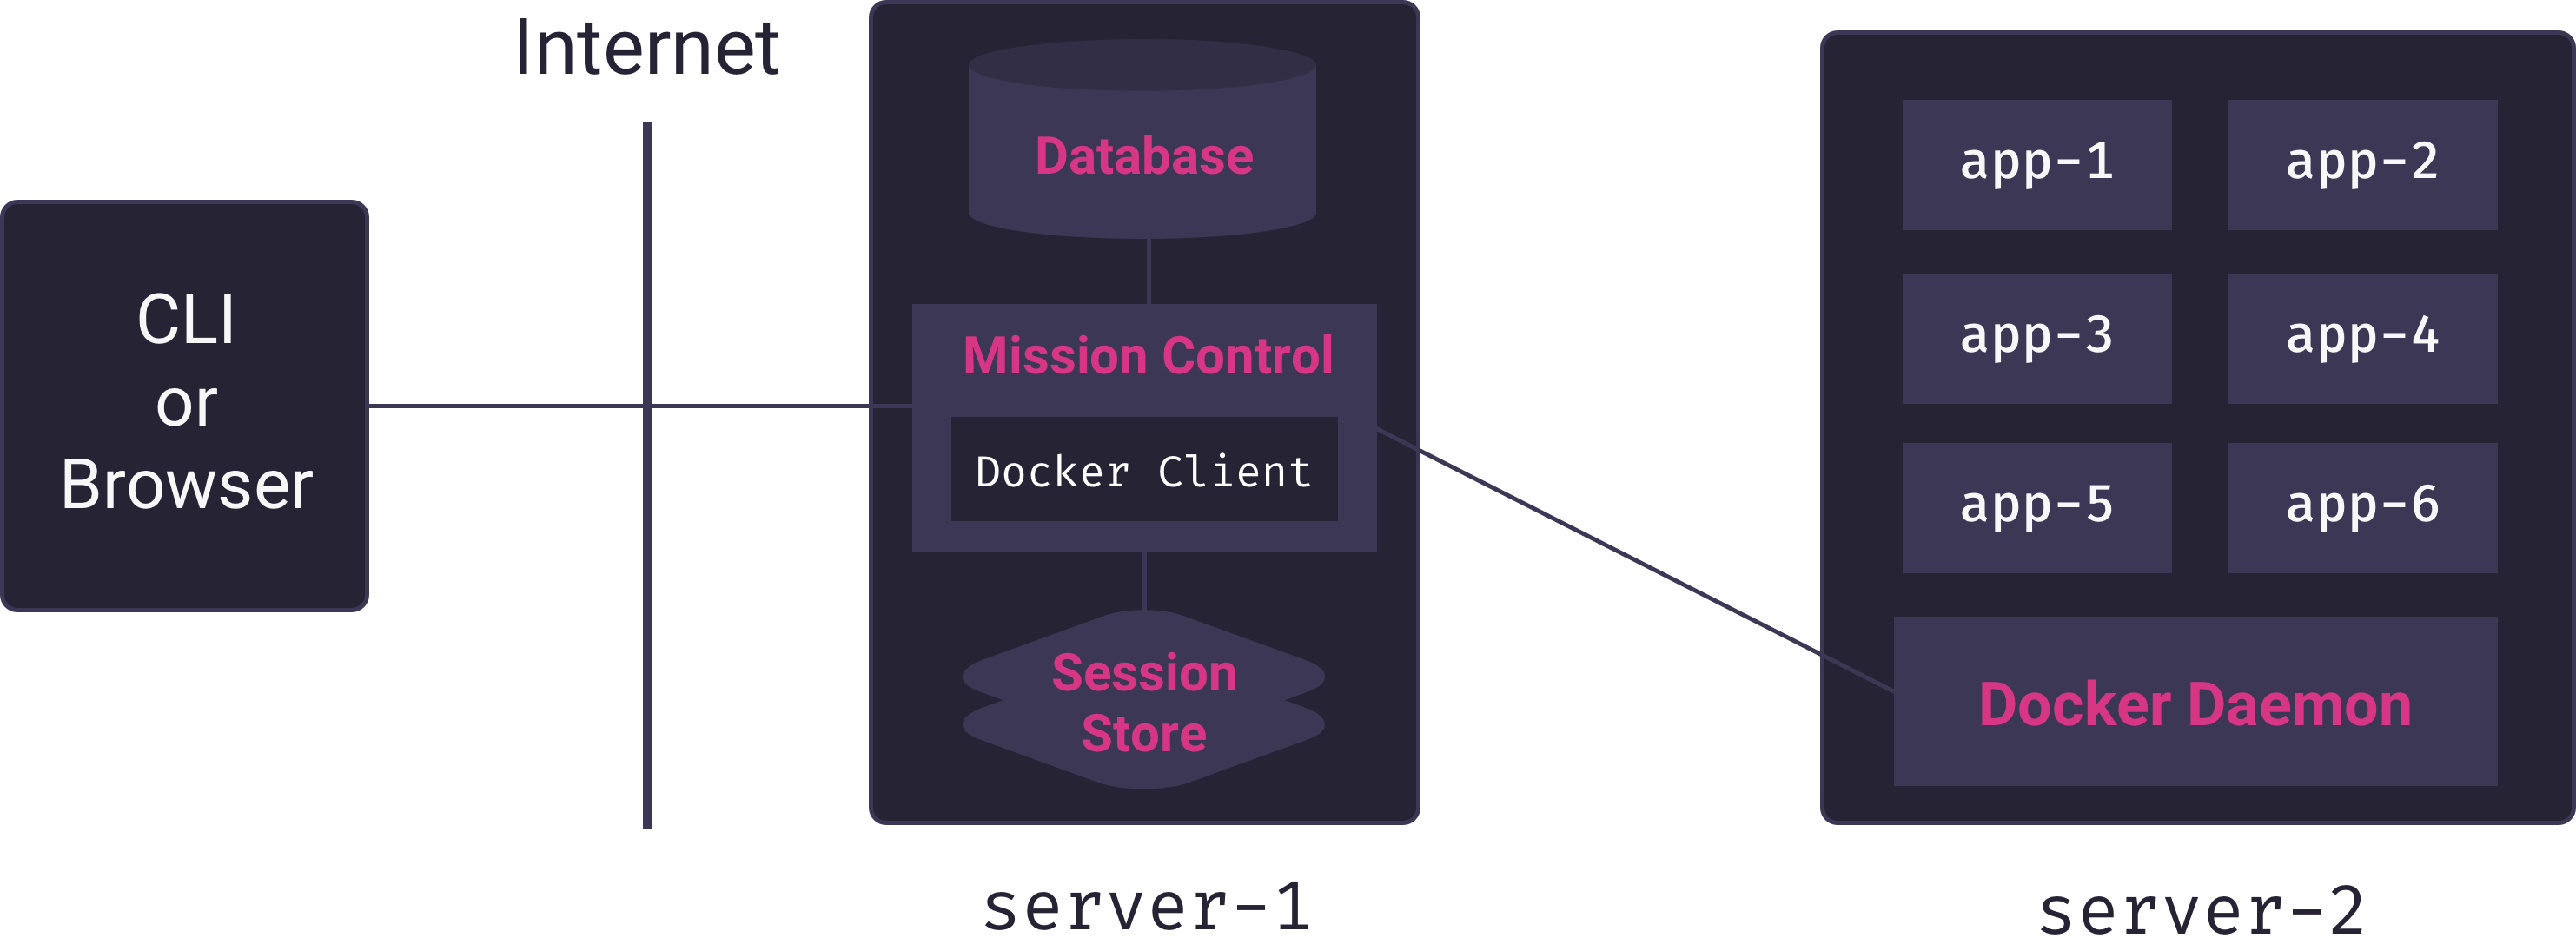
Here we see the Mission Control service (Mothership’s core Node.js application) using a custom Docker client to manage multiple app containers on a remote Docker host. Mission Control acts as a proxy connecting users of the PaaS to the server responsible for hosting apps.
Having chosen to use Docker for app isolation, the remaining question is how we determine which system and application dependencies to install in each application’s container, what command we run to start an application, and how we instruct Docker to do all this.
5.3 Dockerfiles
Early versions of Mothership supported only Rack-compliant applications written in the latest version of Ruby. Generating an appropriate container for such applications was fairly straightforward:
- Install the latest version of Ruby inside the container
- Copy the app source code into the container
- Run
bundle installinside the container to install app dependencies - Start the Puma app server (a Rack compliant app server that can also serve static assets)
We used a custom Dockerfile to give these instructions to Docker: a Dockerfile is simply an imperative set of instructions for generating a Docker container. It was easy enough to make Mothership more flexible by checking the source code for a specific Ruby version and dynamically adjusting the Dockerfile. But a key goal of Mothership was to handle multiple languages and frameworks.
One way of handling this is to create a custom Dockerfile for each language. However, this approach quickly gets unmanageable: it is brittle, requires a deep understanding of the needs of applications written in different languages, and requires constant maintenance. While possible, this approach was not feasible for our small team. A better solution comes from Heroku: the buildpack.
5.4 Buildpacks
Like a Dockerfile, a buildpack contains a set of instructions for generating a suitable environment in which an application can run. The benefit of buildpacks, however, is that there are well-tested, open-source buildpacks that support applications written in many of the most popular languages and frameworks. Additionally, there are standard ways of examining source code and determining which buildpack is appropriate. Although they originated for use within Heroku’s proprietary system, at this point they are effectively an industry standard.
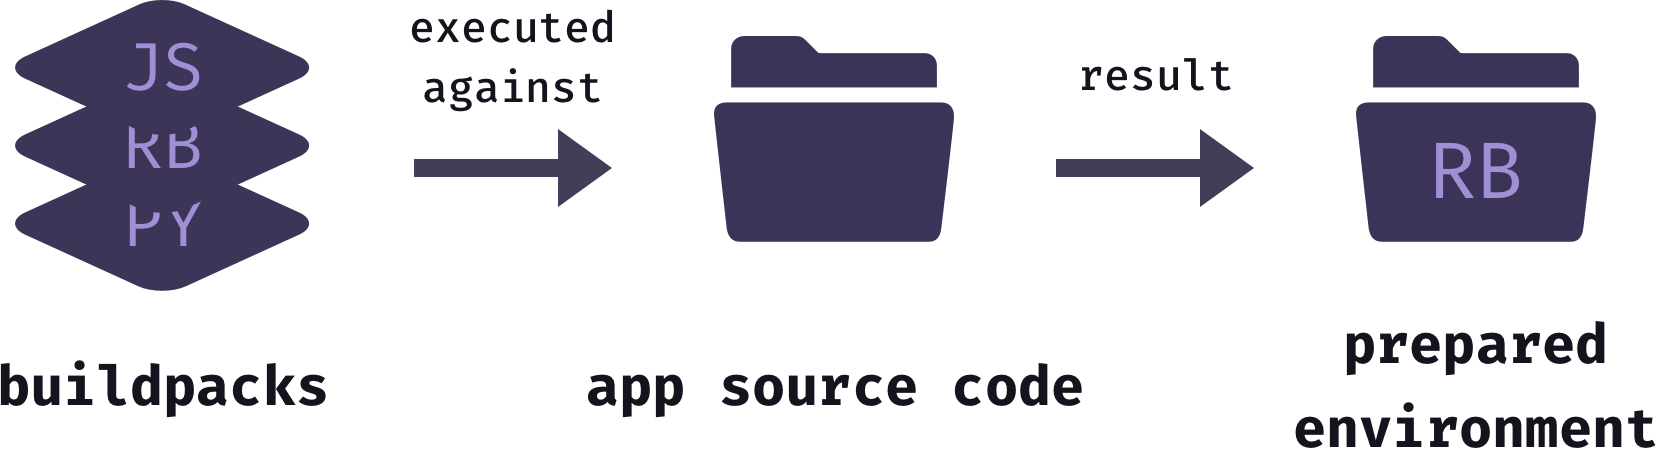
Traditionally, one or more buildpacks are installed on a host operating system, then the buildpacks are executed against a directory of application source code. The result of this build process is a ready to run environment. Different buildpack systems result in different outputs, but all result in an environment ready to run the application. How then can buildpacks be used in conjunction with Docker containers?
5.5 Buildpacks and Containers
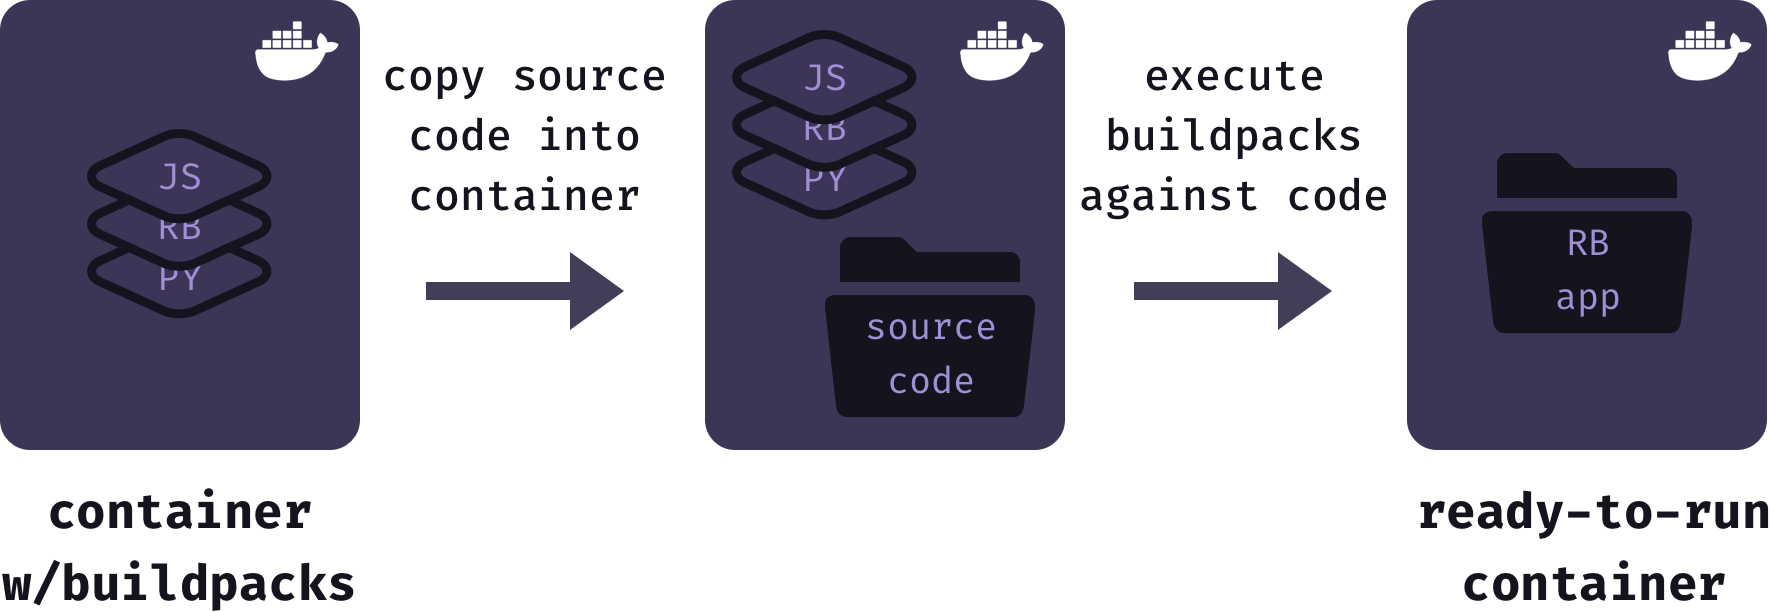
When an application is deployed Mothership starts with a base Docker image that has all supported buildpacks installed. Next, it copies the source code for the user’s application into the Docker container. Then, it executes the buildpacks against the application source code. The result of this process is stored as a finalized and ready-to-run Docker image.
Using buildpacks to generate Docker images allowed us to focus on the architecture and features of Mothership, rather than worrying about the details of containerizing each different application type. However, buildpacks are used internally by Heroku to create dynos, not Docker containers. So Mothership requires a system for generating Docker containers from buildpacks.
To achieve this, we considered an interesting new open-source initiative from Heroku and Pivotal (and recently accepted into the Cloud Native Foundation’s Sandbox): Cloud Native Buildpacks. Cloud Native Buildpacks is essentially a specification for how to convert buildpacks into OCI images in a standard way. Unfortunately, at the moment the implementations of this standard are experimental, and the standard itself is undergoing rapid development. While Cloud Native Buildpacks are an exciting new development, we decided that the technology is still too immature to build Mothership on top of.
Fortunately, the long-standing open-source project Herokuish offers a reliable way of generating Docker images from buildpacks. In our testing, Herokuish was very reliable for the types of applications Mothership is designed for, and so we built it into Mothership.
With a solid containerization strategy in place, the next challenges to consider concern resource scheduling.
6. Resource Scheduling
Recall that our current architecture looks like the following:
Clearly, this doesn’t scale very well. Depending on the initial size of application node, we will quickly run out of resources for deploying applications (in our testing, entry-level IaaS nodes run low on memory once four database-backed applications are deployed). To grow beyond a handful of applications, the PaaS will need to support either vertical or horizontal scaling.
To implement vertical scaling, we could add functionality for users to increase the size (RAM, storage, and CPU) of the application node. Unfortunately, vertical scaling can get very costly very quickly, and there are still hard limits on how large you can scale with this approach.
6.1 Horizontal Scaling
For this reason, Mothership is designed to scale horizontally. Instead of a single application node, Mothership supports an arbitrary-sized fleet of application nodes. As nodes fill up, whoever is in charge of managing the PaaS can simply request that Mothership add another node to the fleet.
A fleet of application nodes raises some new questions that our PaaS must answer:
- Which node should we place newly deployed applications on?
- Which node is a particular application running on?
- If a node is added to the fleet, should we rebalance application distribution?
- If a node crashes, how do we redistribute its applications on to other nodes?
6.2 Container Orchestration
These are (some of the) questions of container orchestration. The standard way of addressing them is by adding a container orchestrator to the system.
To understand container orchestrators, we need to introduce the concept of a service. When, for example, we deploy a simple Node application to Mothership, it is ultimately run as a container. But the particular running container is not to be identified with the application – it is merely an ephemeral instance of the application. If a container crashes, we can start a new container and the application lives on. The application is a service.
The service is one of the key abstractions provided by a container orchestrator. We tell the container orchestrator which services should be on our system, and the container orchestrator is responsible for starting appropriate containers and distributing them amongst the nodes. If a container dies, the orchestrator must discover this (typically via heartbeat checks) and start a new container. It is also responsible for keeping track of available nodes and how to network them.[1] With a container orchestrator in place, our architecture is as follows:
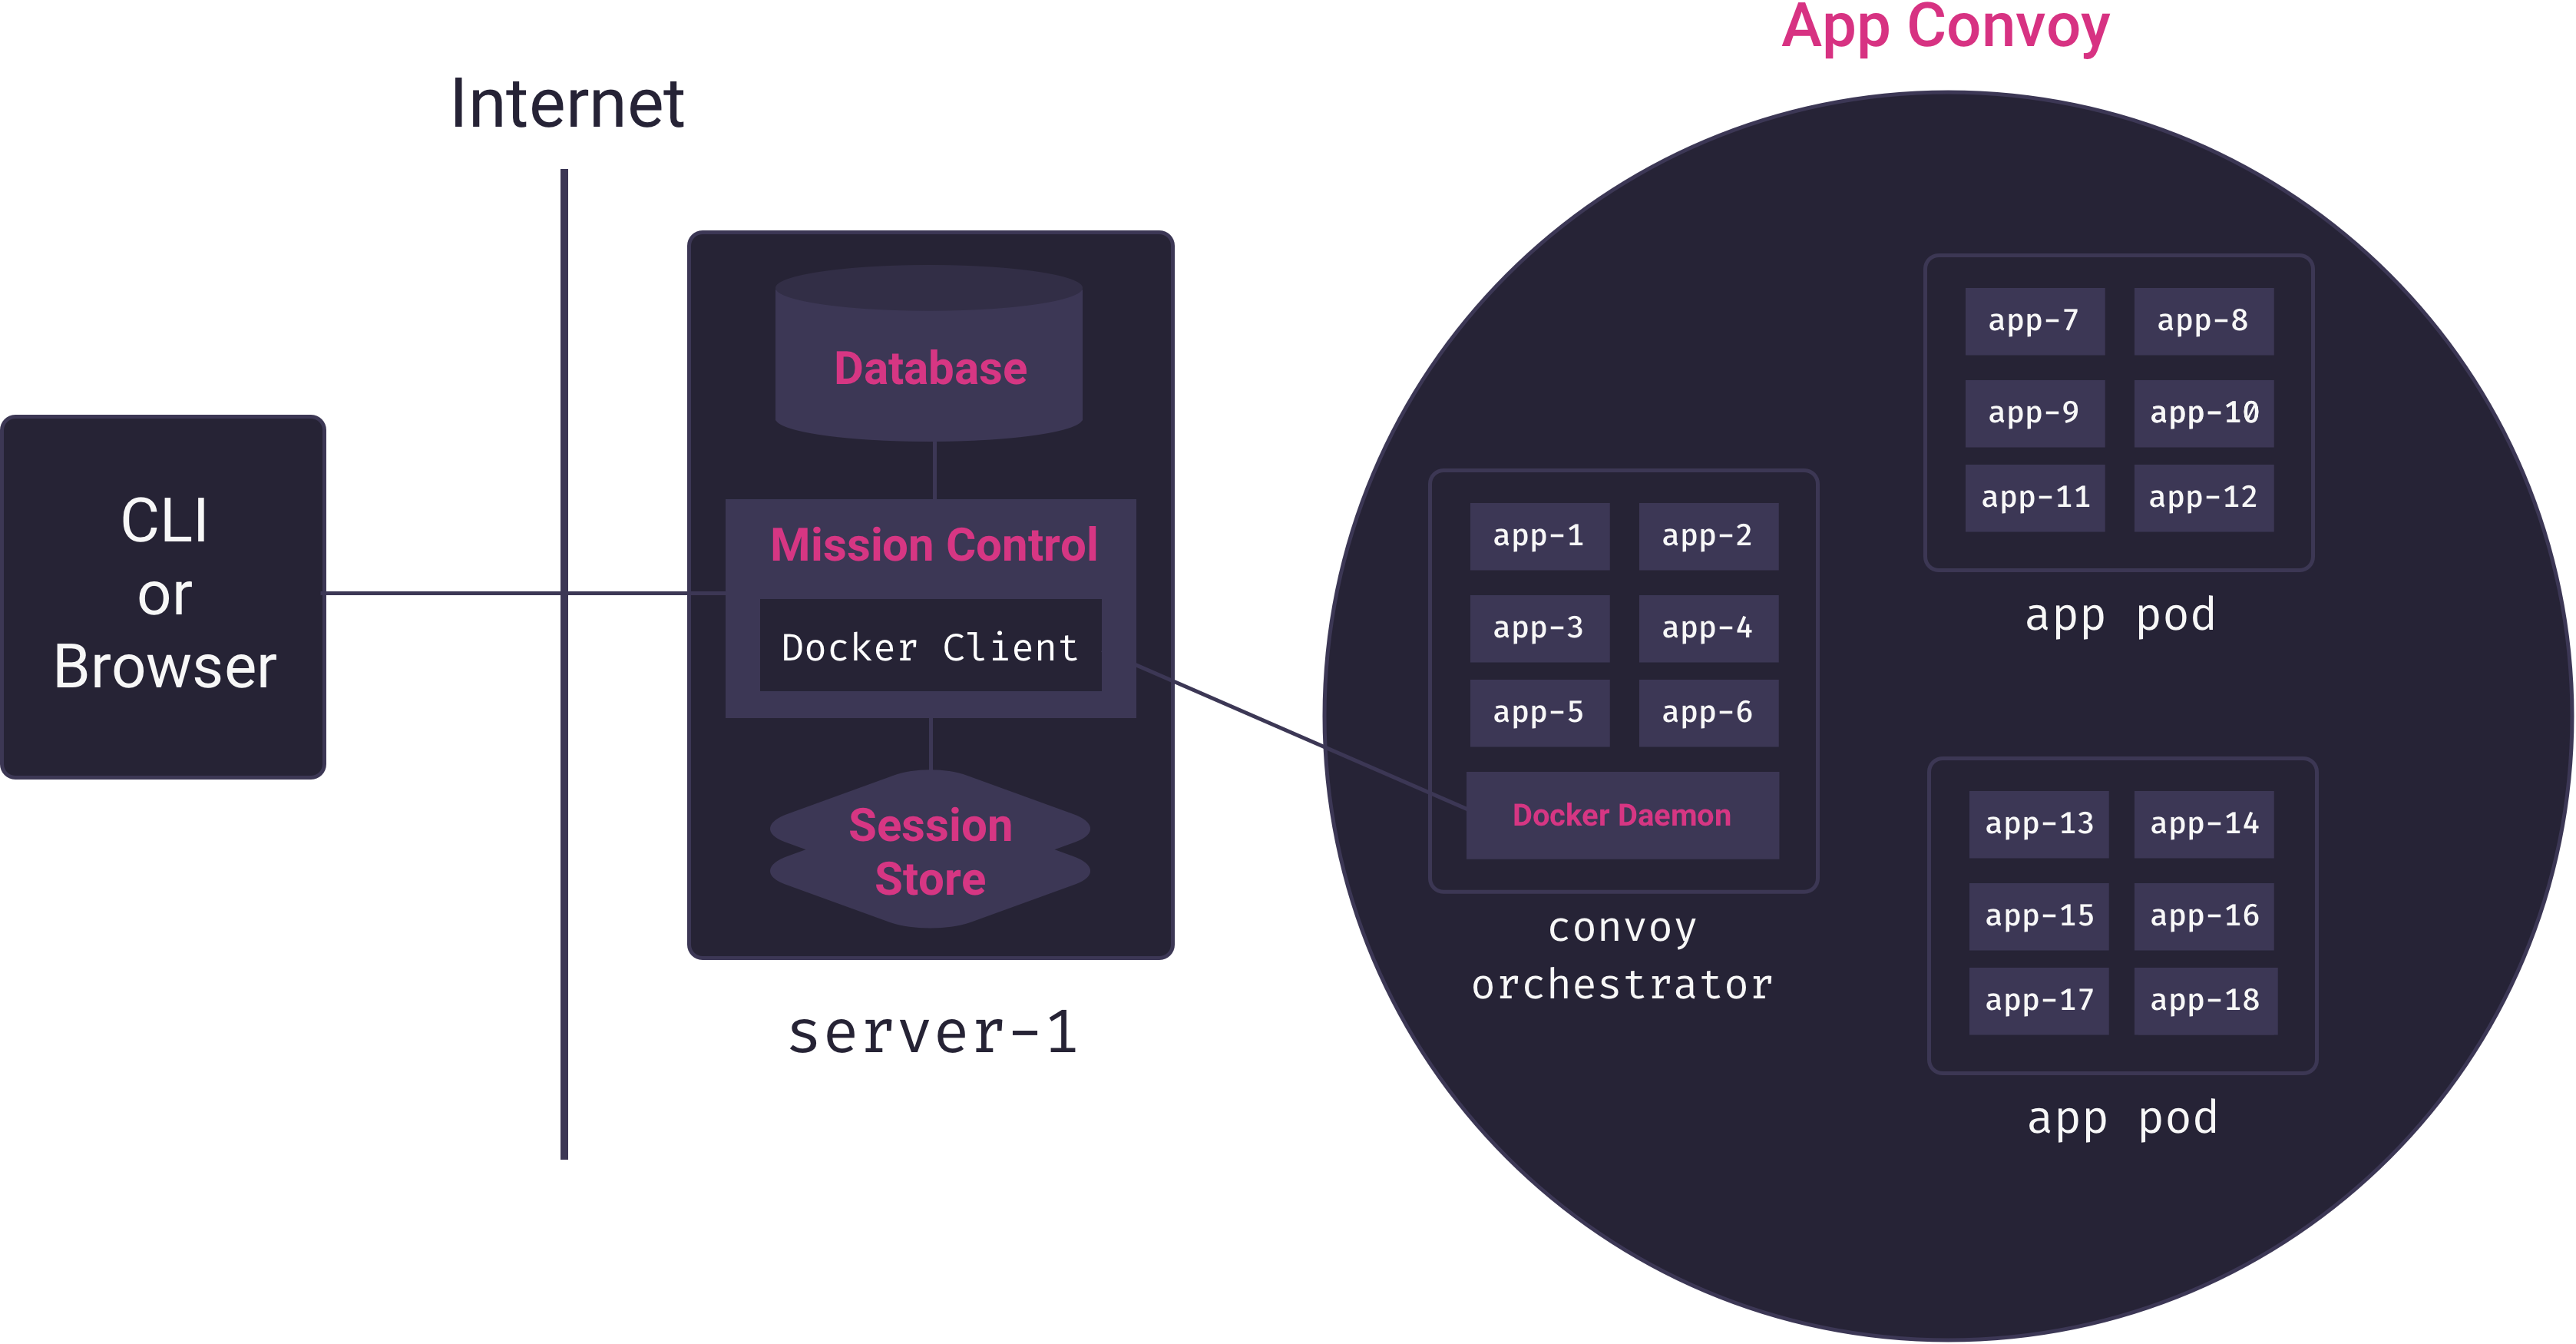
Here, we see that Mission Control talks only to the container orchestrator. The container orchestrator is responsible for distributing app containers across the servers that house apps. We call these servers app pods, and, collectively, they form Mothership’s app convoy. Mothership’s container orchestrator manages the convoy.
6.3 Docker Swarm
The two dominant container orchestrators are Docker Swarm and Kubernetes.[2] We elected to use Docker Swarm for Mothership’s container orchestration for several reasons:
- It is built into Docker
- It has a relatively low learning curve for anyone familiar with Docker
- We can interact with it directly via the Docker REST API
- It handles 95% of our use-case out of the box, and a little elbow grease on our part took care of the remaining 5% (see Service Discovery, below)
The three key concepts in Docker Swarm are nodes, services, and tasks. For our purposes, a node is a server that is connected to the swarm and has Docker installed. There are two types of nodes: worker nodes and manager nodes. Worker nodes are only responsible for housing running containers, while manager nodes are responsible for the actual container orchestration work described above.[3]
We introduced the concept of a service earlier, and noted that they are instantiated by containers. In Docker Swarm, the containers that instantiate a service are called tasks.[4] To deploy a service to the swarm, we describe the service to the manager node and how many tasks the service should have. The manager node then assigns the tasks to the worker nodes. Worker nodes keep track of the state of the tasks assigned to them – if a container dies, the worker must notify the manager node so that it can decide what to do.
Let’s make this discussion less abstract with an example. When a user deploys, e.g. a Node app onto Mothership, Mothership uses a buildpack to generate an appropriate Docker image for the app. Then, using remote API calls, it tells the manager node from the application fleet that there should be a new service, and which Docker image should be used to start tasks for that service. The manager node then inspects the state of its nodes and assigns the service task to an available node. The deployed Node app is now running on that node.
Suppose something goes wrong and the Node app crashes and shuts down. This means the container also shuts down. Suddenly, our application is no longer running. The worker node will quickly discover that the task it was assigned is no longer running, and it will inform the manager node. The manager node knows that we requested one task be kept available for this service, and so it will once again assign that task to an available node. Within seconds, our Node app is back up and running.
6.4 App Services and Database Services
Mothership supports database-backed applications. While it is technically possible to have the application and database running inside of a single container, this violates the Docker model of single-process containers. Instead, when a user requests a database for an application, we create a separate Postgres image and instruct the manager node to create a new database service. How application services are able to communicate with their associated database service is covered below in the Service Discovery section. This keeps applications and databases decoupled, and allows for easy application scaling.[5]
6.5 Application scaling
When we describe a service to the manager, we can stipulate how many tasks we want for the service. The result is as many containers running as we requested. This works best for stateless services. Fortunately, web applications are inherently stateless, so horizontally scaling apps on Mothership is as simple as issuing a single API request to the manager node. Users of Mothership can scale out their apps by simply requesting an increased number of instances.
7. Service Discovery
Now that we have a container orchestrator dynamically distributing tasks across our fleet of application nodes, we have two additional problems to solve:
- How do services talk to one another? In particular, how does an app talk to its database?
- How do we route incoming requests from the Internet to the appropriate service?
These are problems of service discovery:
[A] modern microservice-based application typically runs in a virtualized or containerized environment where the number of instances of a service and their locations changes dynamically. Consequently, you must implement a mechanism that enables the clients of service to make requests to a dynamically changing set of ephemeral service instances. link
7.1 Inter-Service Communication
Application services need to be able to communicate with their associated database services. The trouble is, the tasks for an application’s database are dynamically allocated across a cluster of nodes. In Docker Swarm, there is no guarantee that the tasks for an application and its database are running on the same node. What’s more, both the IP address of the database container itself, as well as the IP address of its host node, can change at any time. The following diagram illustrates the problem:
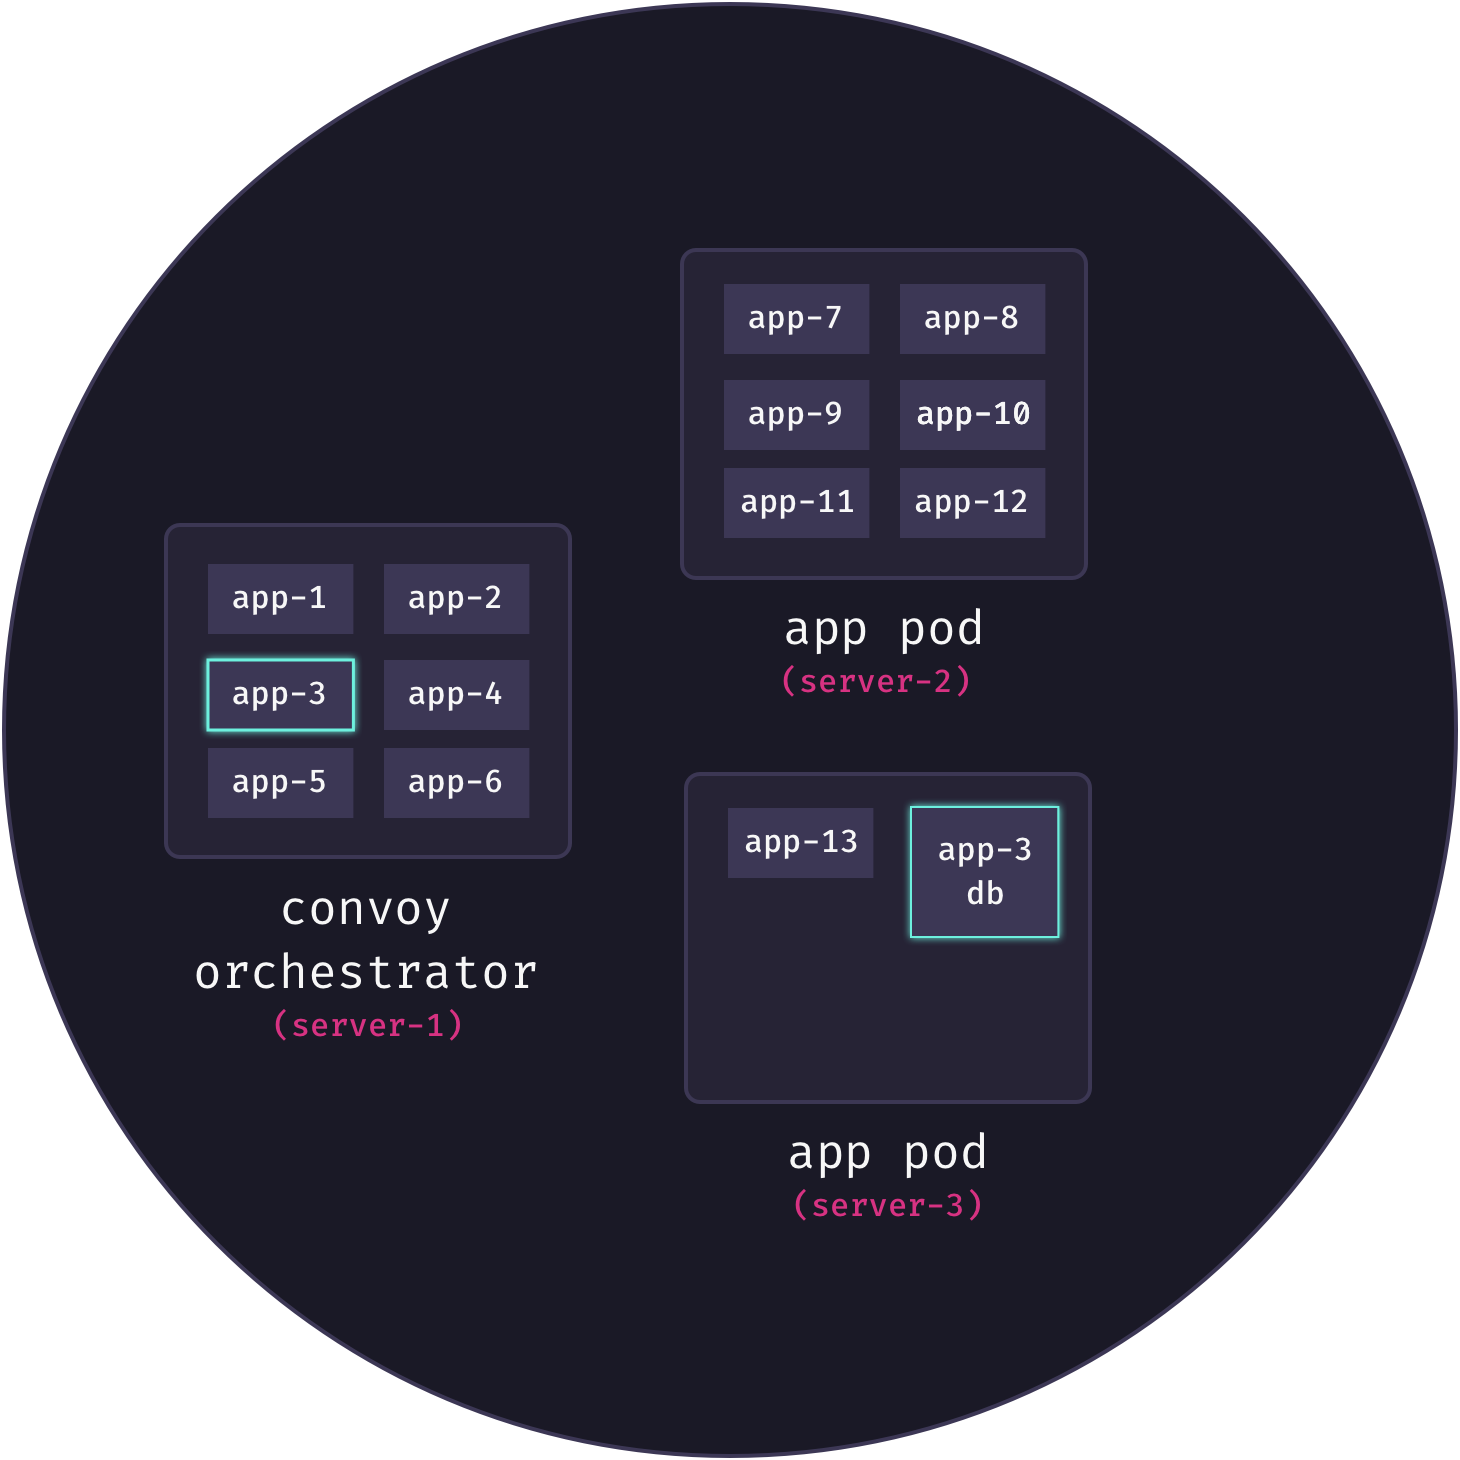
Here, we see that app3 needs to communicate with its database, but these services are not currently connected and in fact are on different servers.
Recall that Docker containers are isolated environments that view themselves as complete operating systems. This means that the only way for two Docker containers to communicate is via a network connection. When we’re talking about multiple containers running on the same Docker host, this can be accomplished by creating a virtual LAN using a Linux bridge link. A Linux bridge is a virtual implementation of a physical network switch. By default, Docker creates a so-called “bridge” network built on top of Linux bridge technology. All containers created on the host are attached to this network by default, and so are able to communicate with one another. This, in fact, is how Docker Compose connects services in local development.
The advantage of this networking model is security. By communicating over a virtual LAN instead of exposing ports on the Internet, containers remain isolated from the outside world. We want this same level of security for our application and database containers. A Linux bridge, however, cannot help us here for the simple reason that communication over a virtual Linux switch is limited to a single Linux host, while our containers are distributed across many nodes.
7.1.1 Using Overlay Networks
Instead, Mothership makes use of an overlay network for connecting services distributed across the fleet. Ultimately, the nodes in our fleet are not connected to each other over a physical LAN – they must communicate over the Internet. But, by using Linux VXLAN technology, it is possible to create a virtual layer 2 subnet that spans a distributed layer 3 physical network (i.e., the Internet). link This is accomplished by tunneling layer 2 Ethernet frames inside of layer 3 UDP packets. This virtual LAN overlays the underlying physical network, giving us the isolation of a layer 2 subnet even though our containers (or their host nodes) are not actually physically connected at the link layer.[6]
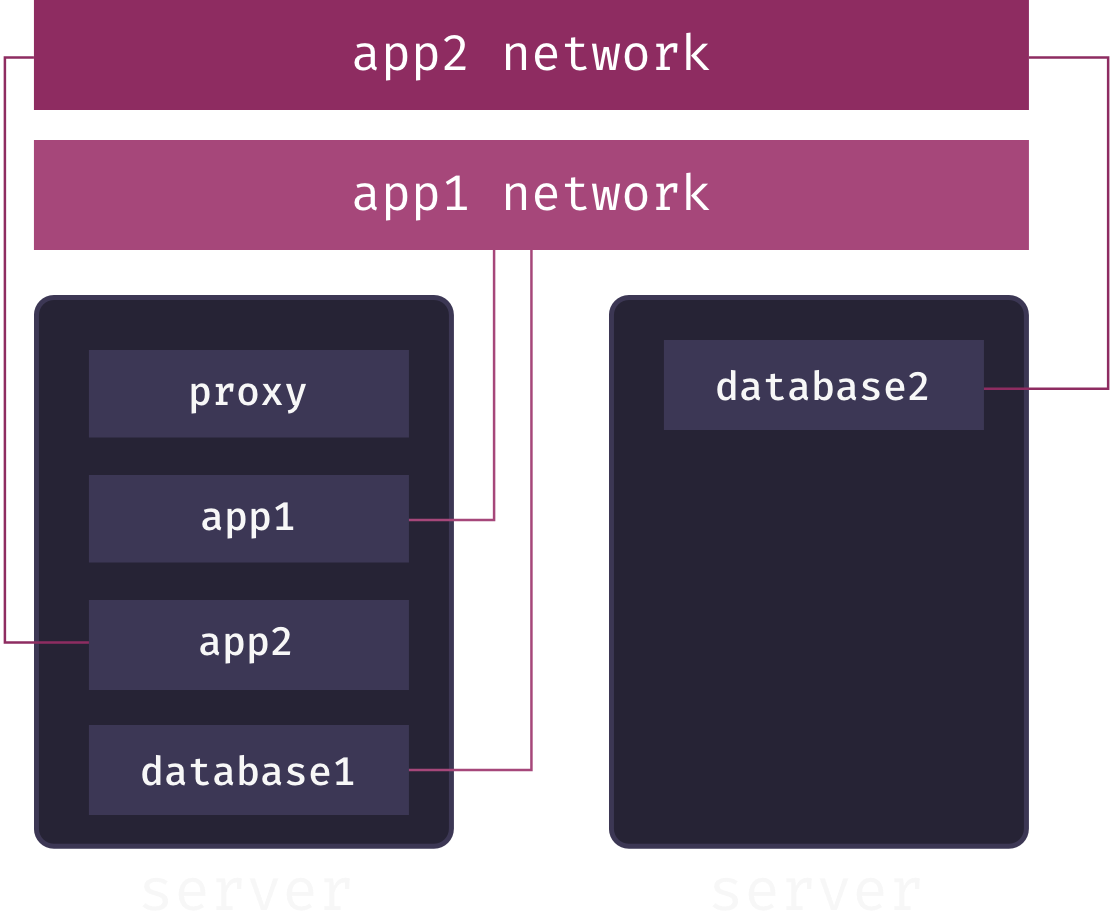
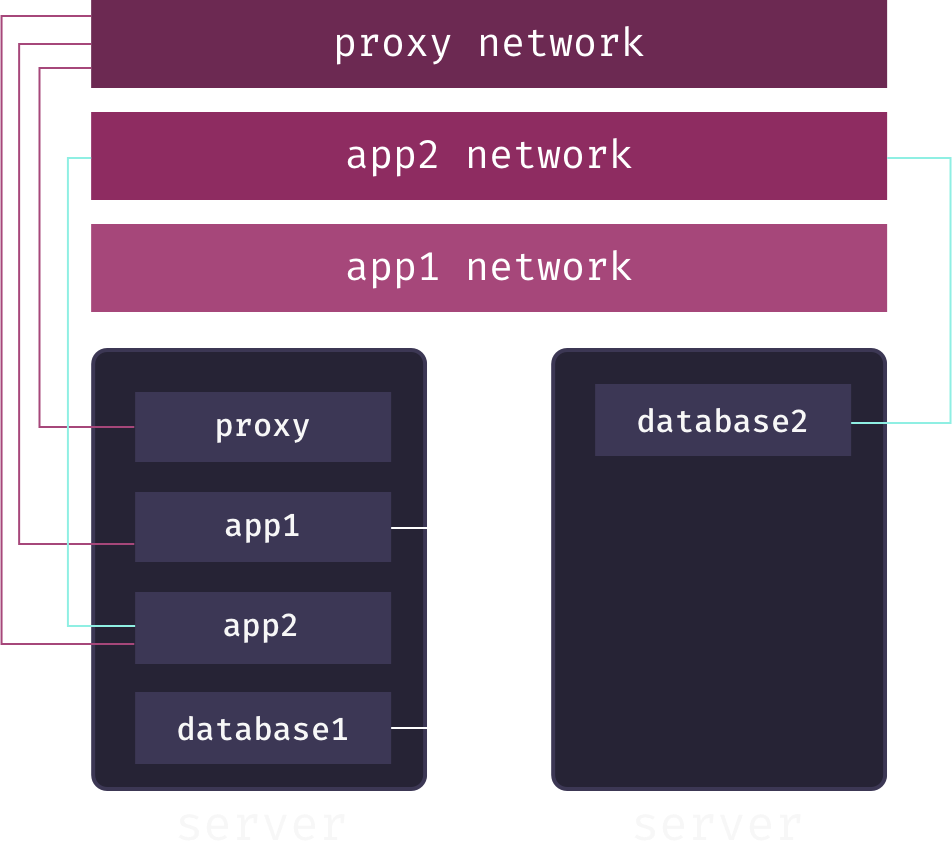
Putting this theory into practice, Mothership creates a separate overlay network for each app service. When a user adds a database to their app, Mothership connects this database to the app’s overlay network. This enables communication between the app and its database, but keeps the database service isolated from both other applications and the outside world. For example, in the following diagram, we have two apps, app1 and app2, each connected to its own overlay network spanning multiple app pods. The databases for each app are also connected to these networks, allowing them to communicate with their respective app:
While secure communication between distributed services is now theoretically possible, we still haven’t solved the service discovery problem: how does the app service know the IP address of the database service on their shared overlay network? The answer is DNS. Service names are mapped to container IP addresses via a DNS server local to the overlay network. Whenever our container orchestrator creates a new container for a service, it updates this DNS server.[7]
What this means is that app services only need to know the service name of their associated databases to send requests to them across the overlay network.
7.2 Handling External Requests
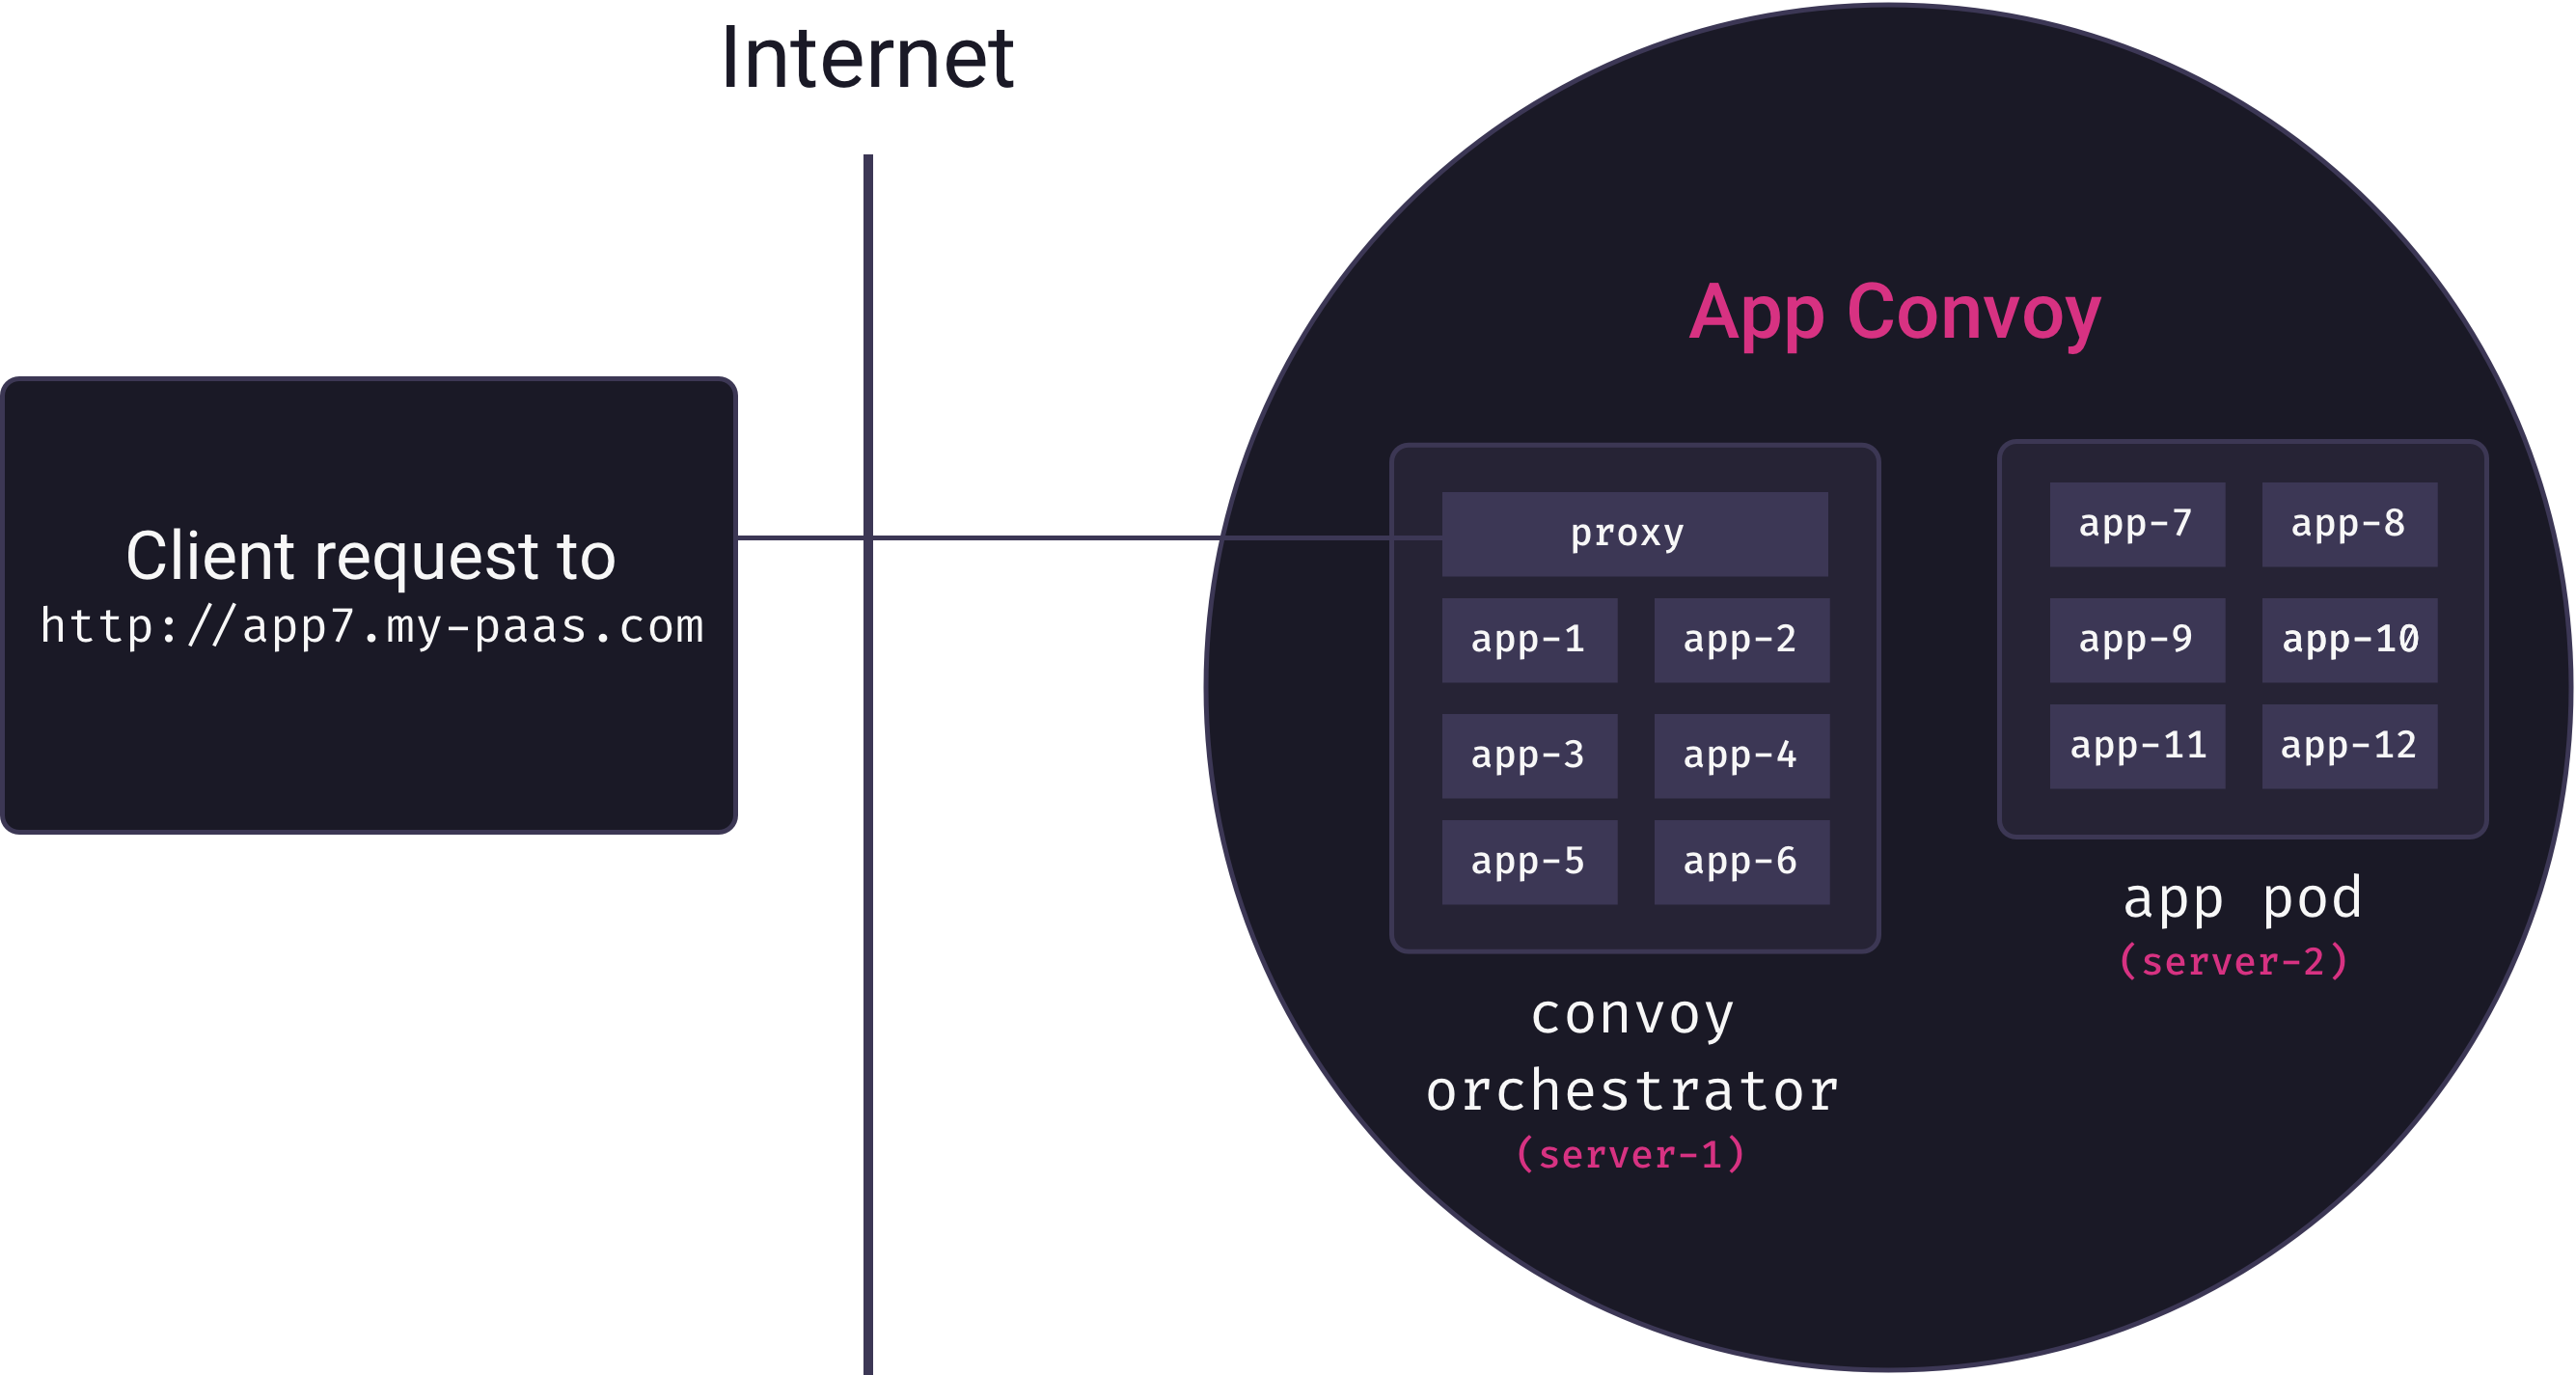
Overlay networks solve the problem of inter-service communication. But now we need to solve the problem of mapping external requests to running containers. Ideally, we’d like deployed applications to be accessible via subdomain URLs (e.g., my-app could be viewed by visiting http://my-app.my-paas.com). But this is not so simple in our distributed, multi-tenant architecture. Consider the following diagram:

Here, a request comes into our system to for app7.my-paas.com. As the diagram reveals, to actually service this request we need answers to the following questions:
- Which app pod currently has a container running for app7?
- How will that app pod forward the request to the appropriate container?
Neither question has a trivial answer. Our container orchestrator moves app containers among pods as needed, so the answer to the first question is a constantly moving target. And our app containers themselves are not yet exposed to the Internet – they are only accessible from within their private overlay networks.
Docker comes with a built-in tool for answering these questions called the ingress routing mesh. Unfortunately, as we explain in the next section, this tool is not appropriate for our use-case.
7.2.1 Ingress Routing Mesh?
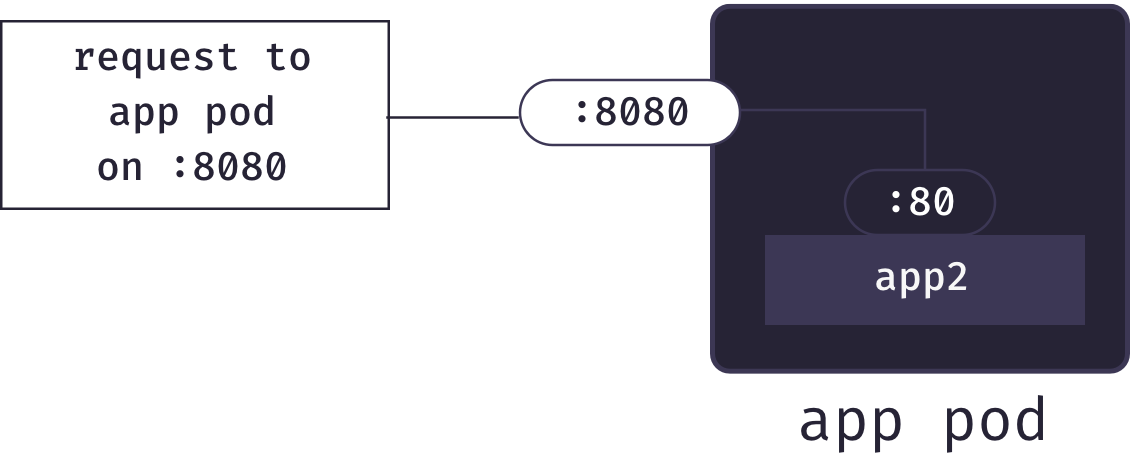
In Docker, the standard approach for exposing containers to the Internet is port publishing. When starting a container, one can request that Docker forward traffic from one of the host’s external ports to a particular port inside the container.[8] For example, we could configure that requests to the host’s port 8080 be mapped to a particular container’s port 80:
Port publishing allows our an app pod to forward requests for an application to the correct container. So once an app pod receives a request, it can pass it along to the correct container. But how do we know which app pod to send a particular request to?
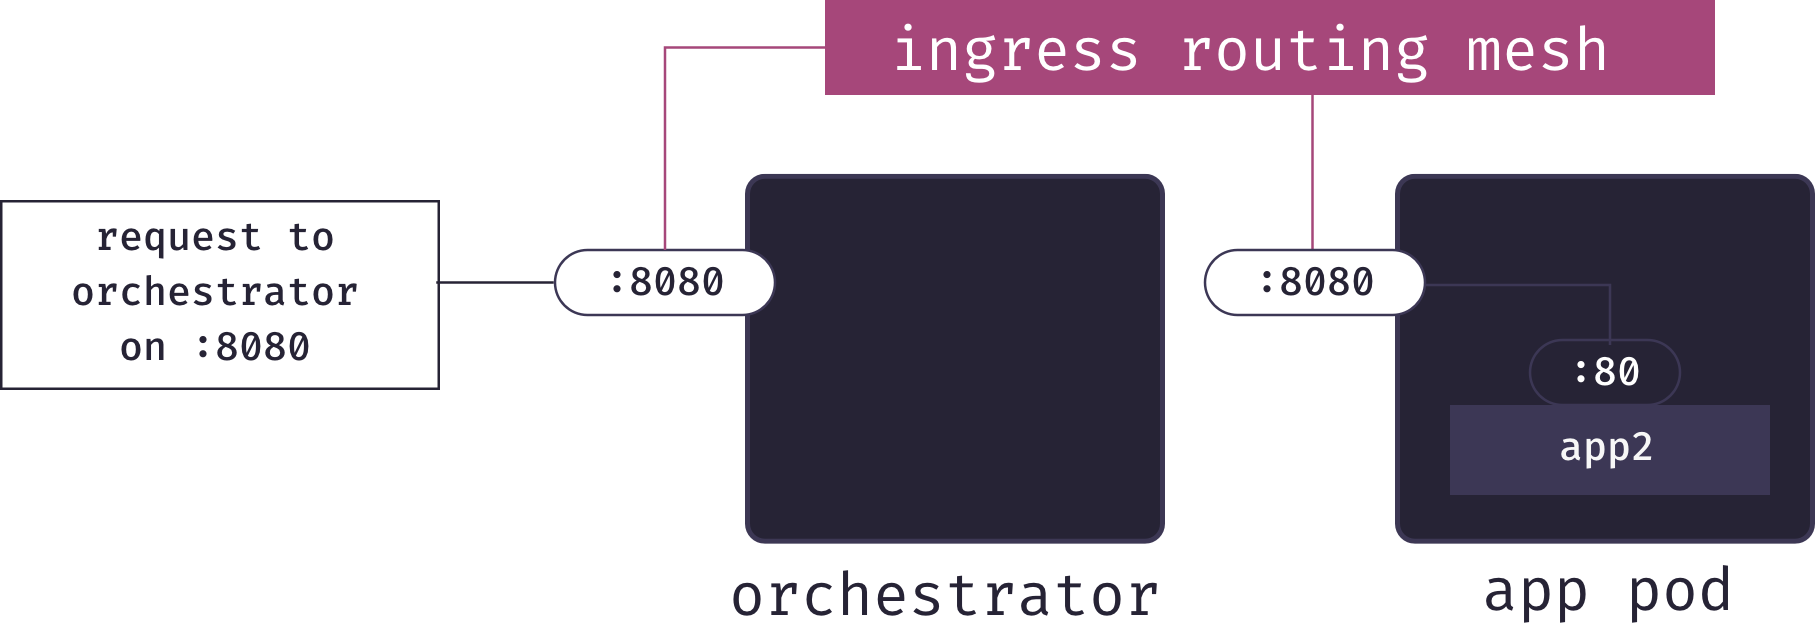
This is where Docker’s ingress routing mesh comes into play. The ingress routing mesh includes a layer 4 load balancer. This load balancer is managed by the container orchestrator, and knows which pods have ports listening for each app. Therefore, when it receives a request on a particular port, it can forward the request to the same port on the correct pod:
Unfortunately, this solution does not fit our use-case. The problem is the sort of URLs this will provide. We’d need to configure our DNS so that my-paas resolves to one of the IP addresses in our cluster; let’s say we point it at the orchestrator for simplicity. To visit a particular app, we’d need to know the port it was published on, and then the URL would be something like http://my-paas.com:54731. This is not a memorable URL, and would appear strange to users who are not familiar with ports. Additionally, the solution requires opening lots of ports on our servers, which is a security vulnerability.
7.2.2 Adding a Reverse Proxy Service
We need some sort of load balancer/proxy, but what Docker provides is a layer 4 load balancer, which requires port numbers in URLs. We, however, want human-readable URLs with app names as subdomains (e.g. app7.my-paas.com). This means that we need our proxy to forward requests based on hostname, which are an application layer concern. So our architecture requires a layer 7 reverse proxy service, such as HAProxy or Nginx. Adding that, our architecture is as follows:
Our reverse proxy must somehow map URLs to containers. As we learned in the section on inter-service communication, this cannot be done by container IP address since these are ephemeral. Indeed, this problem is just another instance of the problem of inter-service communication we solved earlier. And so Mothership solves it in much the same way.
First, we add another overlay network for our proxy service. Then, each time an app is deployed, it is connected not only to its own overlay network, but also to the proxy overlay network, as we see in the following diagram:
The Mothership proxy service can now communicate directly with apps via their service name. This means that each time an app is deployed, we can add a configuration line to our proxy to map a URL to the app service, along the following lines:
http://my-app.my-paas.com→my-app_service
Essentially, the proxy service forwards a request for my-app.my-paas.com to the local hostname my-app_service. The proxy overlay network’s local DNS server ensures that my-app_service resolves to the current IP of a container for my-app.
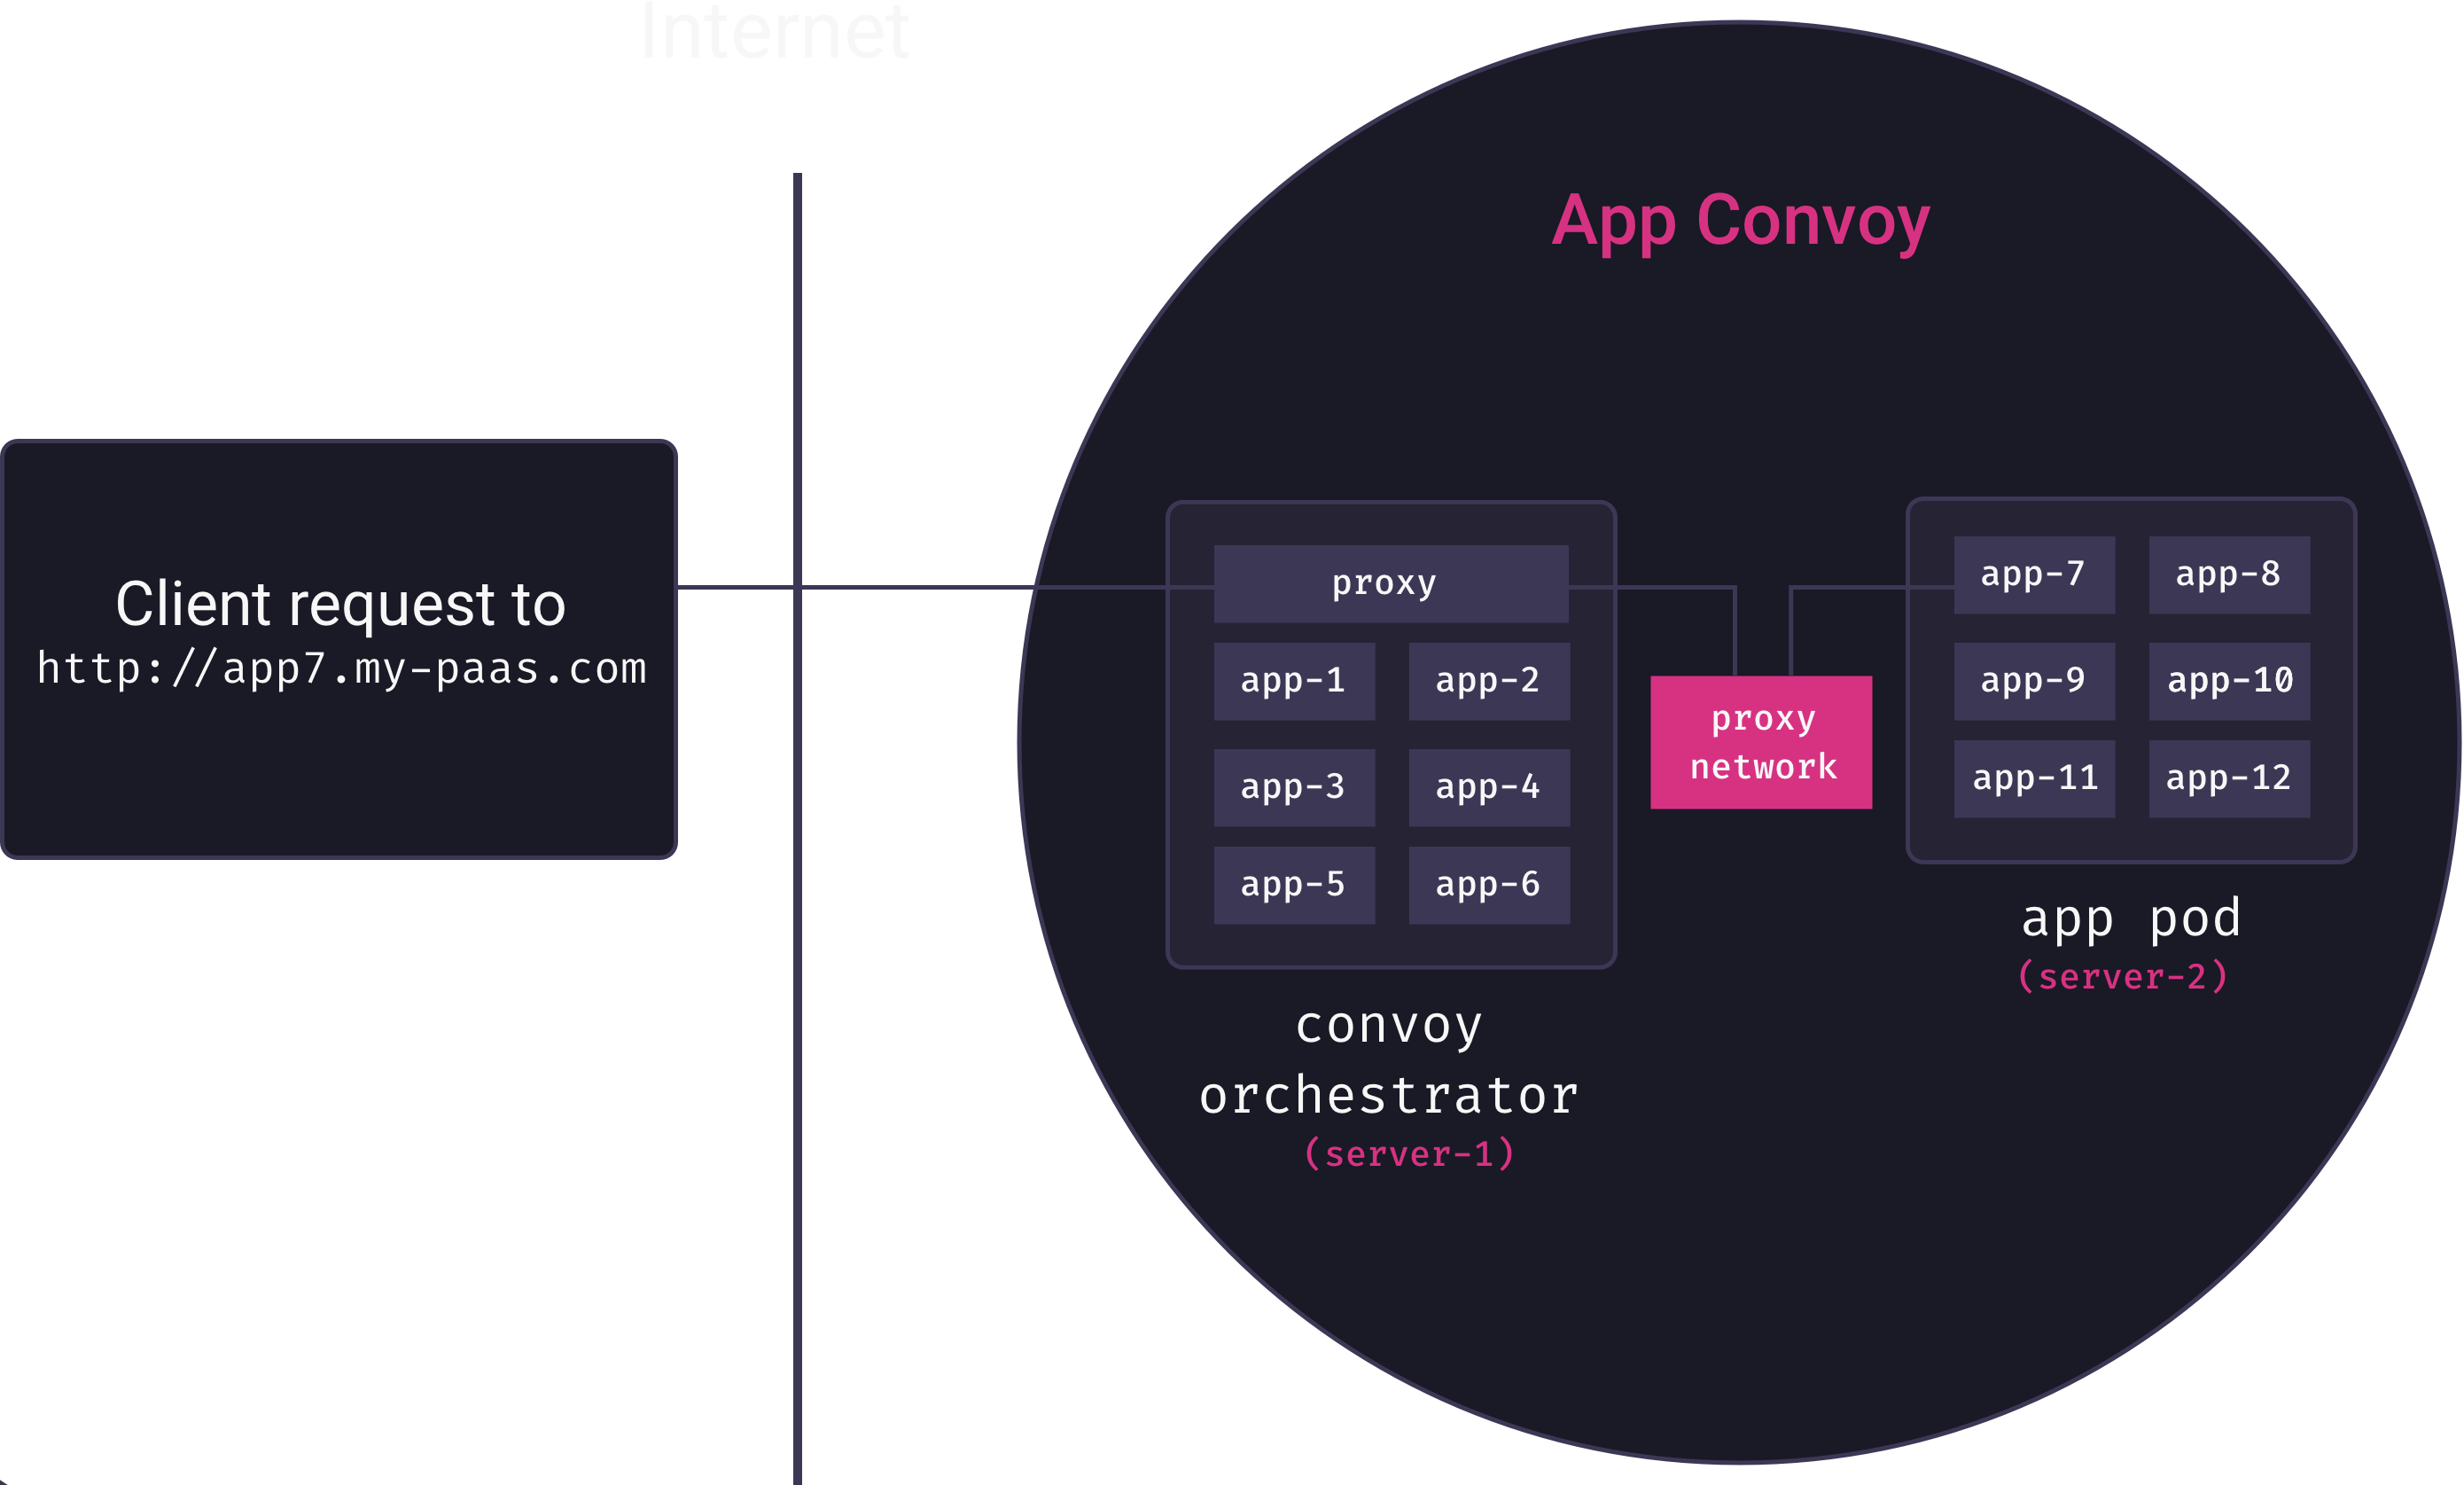
An added benefit of this architecure is that app containers themselves are not directly exposed to the Internet, isolating security concerns to the proxy service. Although our apps don’t need to be directly exposed to the Internet, the Mothership proxy does. In this case, we’ll need to expose a port. Since the proxy is fielding HTTP/S requests, Mothership publishes it on ports 80/443. Since the proxy internally decides which subdomains go to which services, we simply map a wildcard subdomain (*.my-paas.com) to our orchestrator node. Incoming web requests will hit that node on port 80 or 443, and the ingress routing mesh ensures that it gets forwarded to our proxy service, and the proxy then sends it to the appropriate container.
And with that, Mothership’s service discovery challenges are solved.
- Apps can communicate with their databases using overlay networks, without exposing the databases to the outside world
- External requests to apps are routed to running containers via an L7 reverse proxy and an additional overlay network
At this point, it’s worth briefly reviewing Mothership’s core architecture:
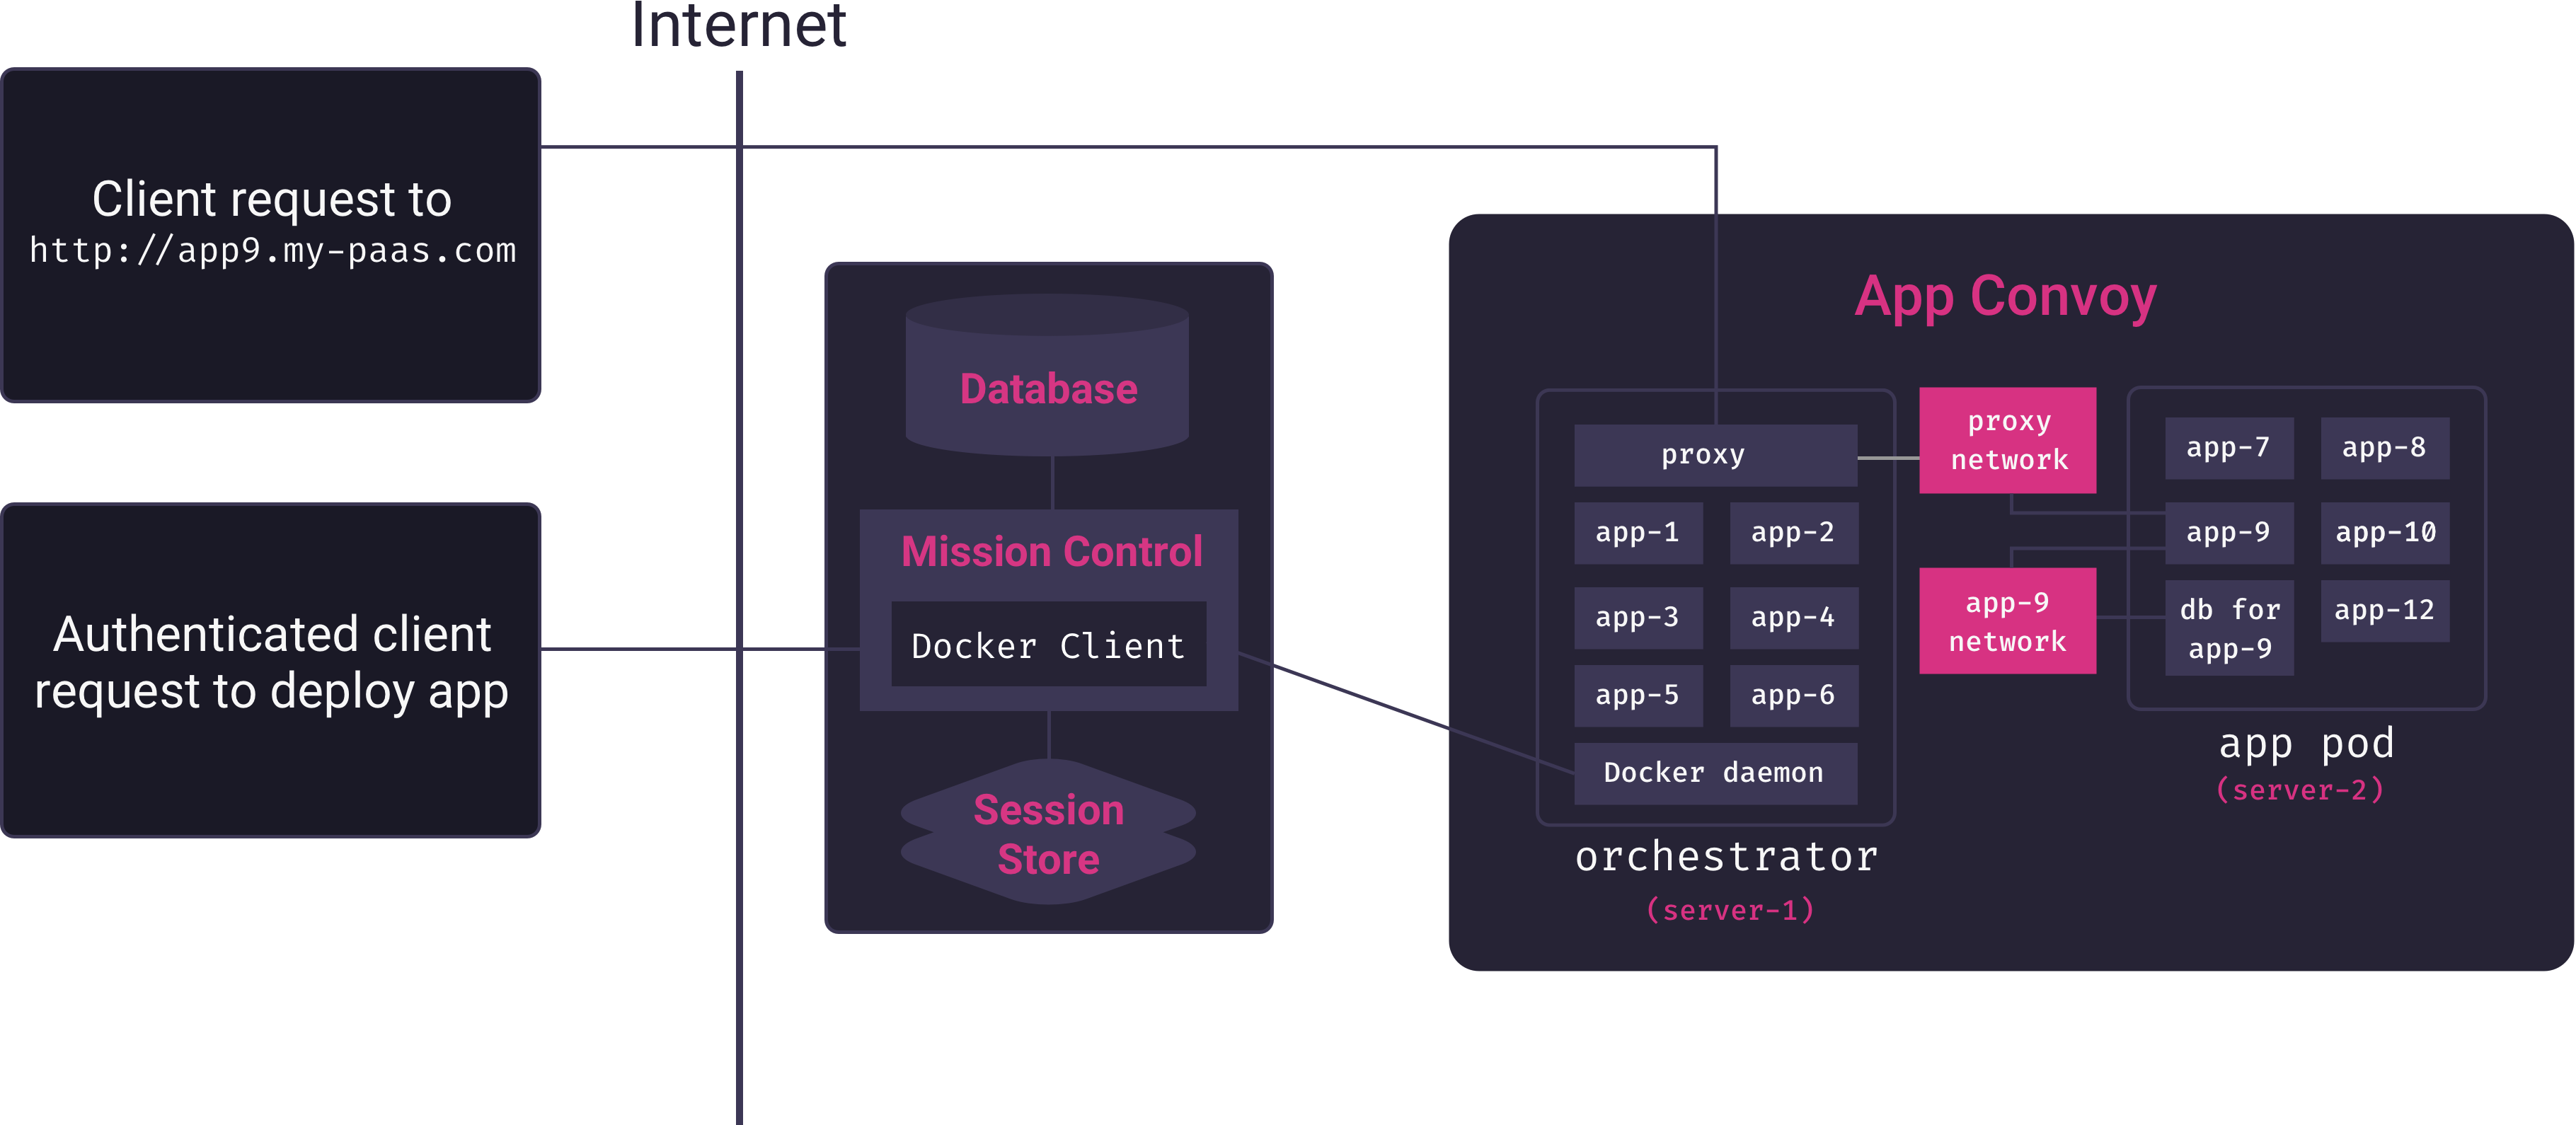
Arriving at this architecture, and solving the many problems it entails, was a major challenge in the development of Mothership. But for our PaaS to be useful to teams looking to deploy internal-facing apps, many features needed to be added, and each involved significant engineering challenges of its own. We turn to these features and challenges next.
8. Essential Features
8.1 Running Terminal Commands
A common deployment need is the ability to run post-deployment commands. In particular, most deployments will need the ability to run database migrations once the application code is deployed and the database is provisioned. There are a variety of ways this can be accomplished, but we decided that the simplest and most powerful is to give developers direct terminal access to their deployed applications.
A benefit of this approach is it gives developers an intuitive way to inspect exactly what the deployed source code looks like. This can be very valuable in debugging deploys to ensure that the correct files made it onto Mothership.
Giving users the ability to interact with containers in the fleet through an in-browser terminal emulator turned out to be a very interesting challenge. The first problem is deciding which container to connect to. A naive approach would be to connect the terminal emulator to one of the already running application containers that is servicing web requests. There are several downsides with this approach:
- Which containers are running for a service and where is an internal concern of our container orchestrator, and not something we have easy access to
- A user might accidentally run a harmful command and break their deployed application (e.g.,
rm -rf ./) - The job of an application container started by our orchestrator is to serve web requests for the application – we shouldn’t burden it with extra load
Mothership takes a different approach. Instead of finding and connecting to an existing container for the application in question, we create a new “one-off container.” This one-off container is based on the same Docker image that we created when the app was deployed, so it is functionally identical to the running containers serving requests. We call it a “one-off” container because its sole purpose is to handle a single terminal session – once the session ends, the container is destroyed to free up resources.
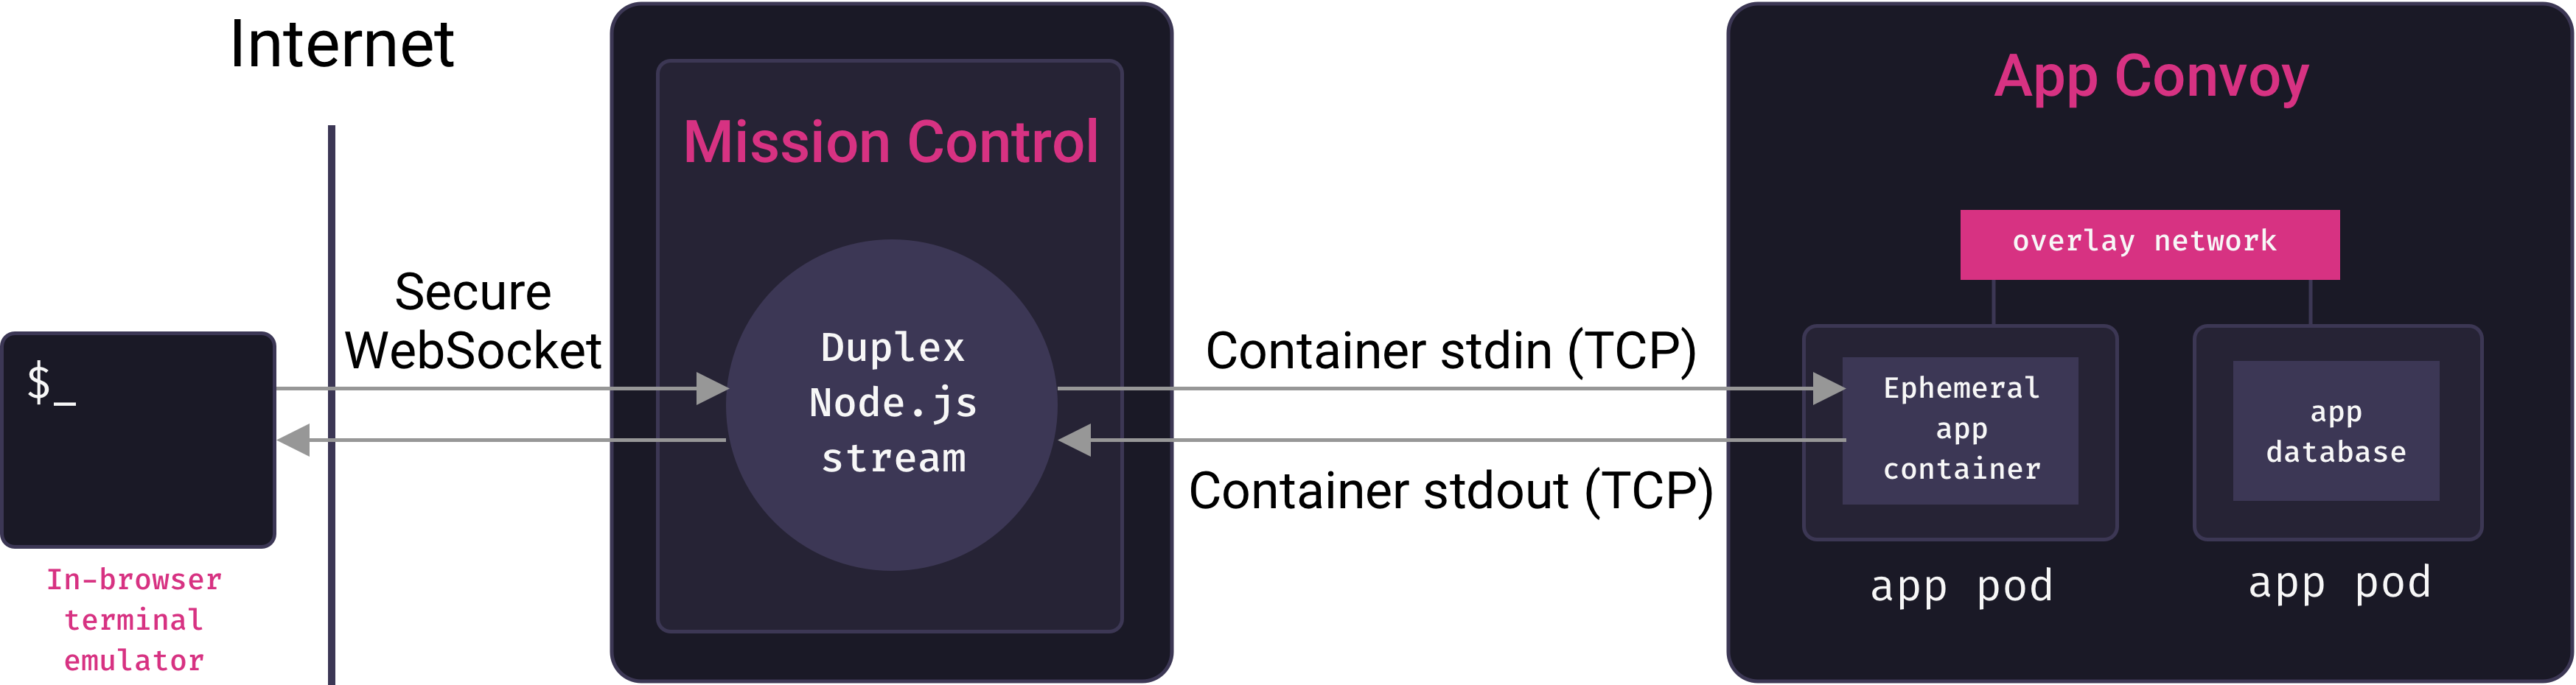
Instead of starting one-off containers with whatever command would boot the application, we start them with the bash command. This starts a shell process and allocates a TTY for the container. Recall that Mothership’s mission control service connects to the remote Docker host in the fleet to create services and containers. If mission control is to send terminal output back to a client, it will somehow need access to a remote container’s stdin and stdout streams. Fortunately, the Docker API makes this possible: we can upgrade our initial HTTP request into a persistent, full-duplex TCP connection over which we can stream to and from the container’s stdin and stdout.
Mission control interacts with this stream as a Node.js Duplex stream object. The next challenge is to expose this stream to clients, so that they can send terminal commands over it and receive terminal output from it.
Since we’re looking for a persistent, bi-directional connection between a browser and our server, the WebSocket protocol is ideal for our use-case. When a user requests to start a terminal session with their app from a browser, the Mothership web client sends a WebSocket request to mission control. Mission control issues a request to the remote Docker host on our orchestrator to create a suitable one-off container, and stream its stdin/stdout over TCP. Mission control then pipes any data coming in from the WebSocket to the container’s stdin stream, and any data coming from the container’s stdout stream out over the WebSocket. In essence, mission control serves as a proxy between clients and the containers they’re interacting with.
To accept client input and output, a simple text field will not suffice. Along with regular character data, the shell will send ANSI escape sequences for formatting output that the client must interpret. The Mothership client uses the Xterm.js terminal emulator to enable this. But what about handling and displaying input?
We initially tried directly display characters the user enters, and then sending them over the WebSocket once the user hits enters. It quickly became apparent that this was not the correct approach. For one thing, the same character can have different meanings in different contexts. At a shell prompt, entering q should cause the letter “q” to be displayed in the prompt. But inside a less process, for example, q should quit the process. Additionally, entering an escape sequence like ctrl-C should have an effect without pressing the enter key. In general, it is the shell’s job to interpret keystrokes and determine the result – whether that’s sending a character to stdout or terminating a process.
So Mothership’s client-side JavaScript directly sends each keystroke over the WebSocket and into the container, and only displays output when it receives stdout data from the WebSocket. This may sound like a lot of overhead for each keystroke, but it is actually quite performant due to the nature of WebSockets.
The final piece to this puzzle is security. The Mothership client requires authentication, so that only authorized users can interact with it. We accomplish this via Express middleware. Unfortunately for us, Node’s HTTP server handles WebSocket upgrade requests directly and never forwards them to our Express app. This means that our Express middleware is never given the chance to authenticate upgrade requests. Without some protective measures, anyone with access to our WebSocket URLs would be able to establish a terminal session with deployed applications – a major security vulnerability.
To prevent this, when an upgrade request comes in, our WebSocket handlers sends another a GET request to our Express application with all authentication headers (cookies or bearer tokens). If the Express application returns a 200 response, authentication was successful and the upgrade proceeds. If it returns a 401 response, authentication failed and we reject the upgrade request.
8.2 Health Checks
Users of a PaaS expect some way of viewing the health of deployed applications – the PaaS should be able to tell whether an application is running in a healthy state. There are many ways of monitoring the health of an application, but Mothership uses a simple, but useful metric. If our container orchestrator has restarted an application more than 5 times in the last minute, this indicates a problem. A variety of things can cause this – more load than a single app server can handle, application errors that crash the server, or configuration errors like forgetting to install the puma gem for an app attempting to boot using the puma command.
When this is happening, Mothership lists the app as unhealthy, otherwise it is considered healthy. The number 5 is somewhat arbitrary, but in our testing, a small handful of restarts is normal, but more than 5 is highly correlated with a problem that is preventing the app from handling requests.
Once again, we use WebSockets to make health statuses visible to user. When a user visits an application’s “show” page, the web client establishes a WebSocket connection with mission control. Mission control then sets a timeout that periodically checks with the orchestrator for application restarts, and sends the result (healthy or unhealthy) to the client over the WebSocket. This result is rendered client-side with a dynamic badge.

8.3 Service Logs
Another critical feature is the ability to view applications logs. For example, if an application has an unhealthy status, a user will want to look at its logs to identify the problem. Because we an application can potentially can have many instances, there is no particular container we want to check for logs. Instead, we want the logs for the entire application service. Fortunately, our container orchestrator happens to aggregate logs for an app service from all running containers, and we can request these via the Docker API.
To present these to clients, we employ a strategy much like we did for terminal sessions. Mission control establishes a direct TCP connection with the container orchestrator, which it receives in a Node.js stream. Any new logs for the relevant app service arrive in this stream. Client-side, we display another terminal emulator, and establish a WebSocket connection to special endpoint in our WebSocket handler. Mission Control pipes output from its service logs stream over the WebSocket connection, and it appears in the client’s terminal emulator.
8.4 Database Backups
Mothership allows users to perform manual backups of application databases. Our basic strategy uses PostgreSQL’s pg_dump utility. This utility dumps the SQL statements needed to restore the database to its complete state as of the time the command is run. It can be run while there are concurrent connections to the database, and guarantees a consistent snapshot (even as concurrent updates are occurring, details). The basic strategy is to run this command in a container with access to the live database – but the actual implementation is surprisingly complicated.
But where do we run pg_dump, and how do we get the output back to the client? Once again, we make use of a one-off container. But a container based on an app image won’t work because these images don’t have PostgreSQL installed in them. Instead, we use the official Postgres image.
The next step is somewhat tricky. We cannot simply start the container with the pg_dump command. If we do that, we override the image’s default command which starts the Postgres daemon – and we can’t run pg_dump if there’s no Postgres daemon. To solve this problem, we attach the one-off Postgres container to the app’s network so it can talk to the live database server. pg_dump can connect to remote postgres servers and run against them: so we run pg_dump to start the container, but tell it to connect to the app’s running database container.
How do we get this dump back to the client? By default,pg_dump sends its output to stdout, although you would normally redirect this to a file. Since our PaaS server is connected to this container via a TCP connection with the Docker host, its stdout is available to us as a stream on the PaaS. So we let pg_dup stream its output to stdout in its container, and then we capture that stream in the PaaS and redirect it into a temporary .sql file. Once the stream ends, we remove the temporary postgres container, send the file to the client, and then remove the temporary file.
8.5 Deploying and Scaling Mothership
One of the downsides of an open-source PaaS is that users must manage it themselves. In particular, the tasks of initially deploy a PaaS has the potential to be more work than it’s worth, as does the task of scaling the PaaS as the number of deployed applicaitons grows. One of the driving goals of Mothership was to make these tasks as easy as possible.
Let’s first examine Mothership’s strategy for handling scaling. From the CLI, a user can run the command mothership cluster-scale. This adds an additional app-pod to the convoy. The container orchestrator will take care of this pod as it sees fit. Easy. But there are a number of not-so-easy steps that must be completed to enable this:
- We must provision a new server with the user’s IaaS account
- We need to install Docker on this server
- We need to register this new server with our container orhcestrator
Mothership uses Docker Machine to handle server provisioning. Docker Machine comes with “providers” for many IaaS providers (Digital Ocean, Linode, AWS, and many others). These providers do the work of sending the requisite API calls to the IaaS provider in question to get a server provisioned with Docker installed and the correct ports open. By using Docker Machine, we freed ourselves to work at a higher level of abstraction in implementing scaling. Once we have this new Docker host, we can send it an API request instructing it to register itself on our Convoy.[9]
The first thing we did to ease the task of deploying Mothership was to containerize the application. Mothership requires the main Node.js app, as well as a Postgres database and a Redis server. We provision and connect these three pieces with a Docker compose file. But there are still quite a number of steps required before and after typing docker compose up. Multiple servers must be provisioned, a Swarm cluster must be established, many configuration fields must be set in the database, and the proxy service must be created.
To make all of this as easy as possible, Mothership has a CLI tool called mothership-setup that automates the entire process. Currently, this tool only supports Digital Ocean, although we’re working to support more IaaS providers in the future. The tool prompts you for a Digital Ocean API token, along with the URL you’d like your PaaS deployed to, and then handles the rest. After it work is done, the tool gives you instructions on the two DNS entries you must add to your domain to make Mothership live.
9. Future Work
- Increase testing coverage
- App versioning and deployment rollbacks
- Support background jobs for apps
- Achieve CLI feature-parity with web interface
- Migrate automated setup to Terraform
A container orchestrator has several other critical responsibilities, as we’ll see in the next section on service discovery. ↩︎
Officially, Docker Swarm was a separate product from Docker that is now deprecated, while Swarm Mode is the current container orchestrator built into Docker as of v1.12. Whenever we say “Docker Swarm”, we are referring to “Docker in Swarm Mode.” ↩︎
Manager nodes in Docker Swarm are convenient in that they can serve dual-duty as worker nodes. This makes it possible to have a cluster with a single node, which is how Mothership operates on first setup. ↩︎
There is a subtle distinction between a task and a container that is immaterial to the present discussion. ↩︎
Since containers are ephemeral, but database data is persistent, we make use of Docker volumes to persist database data. ↩︎
The implementation details of Docker overlay networks get pretty hairy, but this reference article is a good place to start. ↩︎
This is an oversimplification because there may be multiple running containers for a given service. Docker Swarm uses DNS round-robin load-balancing to distribute requests to services among running containers. ↩︎
Under the hood, Docker accomplishes this via heavy use of Linux iptables rules. ↩︎
We don’t go into details here due to space, but even here there were surprising complexities. For example, scaling a Convoy down requires telling a pod to leave the swarm, and then telling the Convoy to delete that pod. This requires two Docker API calls. Unfortunately, the call for the pod to leave returns a response before it has fully left, but the call for the Convoy to delete it can only succeed after it has fully left – an unfortunate race condition with no clean solution. ↩︎